LogParser Loves Security Logs

Just digging something up that I used to use regularly to look for logon events related to a certain username (samAccountName). Thought I’d regurgitate them here for “the next time..”

Three different SQL queries for three different use cases:

Case 1. I know that the logon event that I’m looking for occurred on DC01.oholics.net, I’m therefore going to interrogate the live DC log. The primary username I’m looking for is “jon”, a secondary name shown as “dave”. This could be replaced by a junk string if I’m only really looking for “jon”, or just trim the query (up to you.. ).

SELECT * INTO C:\TEMP\Output\output.csv
FROM \\DC01.OHOLICS.NET\security
WHERE TimeWritten > TIMESTAMP ( '2009-01-01 01:00:00', 'yyyy-MM-dd hh:mm:ss' ) AND SourceName = 'Microsoft-Windows-Security-Auditing' AND
( Strings LIKE '%jon%' OR strings LIKE '%dave%')

Case 2. In my domain, there are three domain controllers, I’m not sure where the logon events happened, so as in Case 1 I search the live DC logs, but this time searching all DC’s logs.

SELECT * INTO C:\TEMP\Output\output.csv
FROM \\DC01.OHOLICS.NET\security;\\DC02.OHOLICS.NET\security;\\DC03.OHOLICS.NET\security
WHERE TimeWritten > TIMESTAMP ( '2009-01-01 01:00:00', 'yyyy-MM-dd hh:mm:ss' ) AND SourceName = 'Microsoft-Windows-Security-Auditing' AND
( Strings LIKE '%jon%' OR strings LIKE '%dave%')

Case 3. I have three months of backed up logs to search through (in C:\TEMP\Logs) for all logon events for samAccount name “jon” (and optionally “dave”, as above). I may splurge out the script that I used to use to backup and clear the event logs next, that could be useful again – I’ve got to clean it first.

SELECT * INTO C:\TEMP\Output\output.csv
FROM C:\TEMP\Logs\*
WHERE TimeWritten > TIMESTAMP ( '2009-01-01 01:00:00', 'yyyy-MM-dd hh:mm:ss' ) AND SourceName = 'Microsoft-Windows-Security-Auditing' AND
( Strings LIKE '%jon%' OR strings LIKE '%dave%')

Usage: logparser -i:EVT file:<SQLFileName>.sql -o:CSV -resolveSIDs:ON 

Where:

  • The above SQL query is saved as LogParserRedaction.sql in the same location as the LogParser binary.
  • The collection of logs to be redacted are in C:\TEMP\Logs\
  • The output file will be written to C:\TEMP\Output\output.csv
Redacting sensitive content from Windows event logs using LogParser

Consider the scenario: opening a ticket within Azure for an issue with an infrastructure component or security event. IP addresses, domain names and Machine names are classed as sensitive and should not be revealed to MS support staff.

You have a folder filled with event logs from the problem machine(s). You need to redact the above mentioned properties.

By using LogParser with the following sql statement, a CSV file is exported which strips out the sensitive properties, replacing parts of the properties with X’s.

  • OHOLICS‘ is replaced by XXXXXXX‘ where it is found in an event log, in the Strings, ComputerName, Message or Data fields
  • The first two octets of an IP address are stripped, where these are ‘192.168.’ in the Strings, Message or Data fields
  • blog.oholics.net‘ is replaced by blog.XXXXXXX.net‘ where it is found in an event log, in the Strings, ComputerName, Message or Data fields

Note that after the output file is created, the header row will need to be updated to remove the replace statements. Where normally just the item name would be added as a header, the full replace query is added as the header for those items.

SELECT
EventLog,
RecordNumber,
TimeGenerated,
TimeWritten,
EventID,
EventType,
EventTypeName,
EventCategory,
EventCategoryName,
SourceName,
REPLACE_STR(REPLACE_STR(REPLACE_STR(Strings,'OHOLICS','XXXXXXX'),'192.168.','X.X.'),'blog.oholics.net','blog.XXXXXXX.net'),
REPLACE_STR(REPLACE_STR(ComputerName,'OHOLICS','XXXXXXX'),'blog.oholics.net','blog.XXXXXXX.net'),
SID,
REPLACE_STR(REPLACE_STR(REPLACE_STR(Message,'OHOLICS','XXXXXXX'),'192.168.','X.X.'),'blog.oholics.net','blog.XXXXXXX.net'),
REPLACE_STR(REPLACE_STR(REPLACE_STR(Data,'OHOLICS','XXXXXXX'),'192.168.','X.X.'),'blog.oholics.net','blog.XXXXXXX.net')
INTO C:\TEMP\Output\OUTPUT.CSV
FROM C:\TEMP\Logs\*

Usage: logparser -i:EVT file:LogParserRedaction.sql -o:CSV -resolveSIDs:ON 

Where:

  • The above SQL query is saved as LogParserRedaction.sql in the same location as the LogParser binary.
  • The collection of logs to be redacted are in C:\TEMP\Logs\
  • The output file will be written to C:\TEMP\Output\OUTPUT.CSV

Document Azure NSG’s

Again, not something that I usually get too involved in but…. it is always fun to write some PowerShell:

Connect-AzureRmAccount
$Subscription = "<Subscription-GUID>"
$LogFile = "C:\<PATH>\NSGs.csv"
If (Test-Path $Logfile) {
Clear-Content -Path $Logfile
}
Add-Content $LogFile "nsg,rule,protocol,SourcePortRange,DestinationPortRange,SourceAddressPrefix,DestinationAddressPrefix,SourceApplicationSecurityGroups,DestinationApplicationSecurityGroups,Access,Priority,Direction"
Set-AzureRmContext -Subscription $Subscription
$NSGs = Get-AzureRmNetworkSecurityGroup
foreach ($nsg in $NSGs) {
foreach ($rule in $nsg.SecurityRules) {
select-object nsg, rule, protocol, SourcePortRange, DestinationPortRange, SourceApplicationSecurityGroups, DestinationApplicationSecurityGroups, SourceAddressPrefix, DestinationAddressPrefix, Access, Priority, Direction
$NSGName = $nsg.Name
Write-Host "NSGName" $NSGName
$NSGRuleName = $rule.name
Write-Host "NSGRuleName" $NSGRuleName
$NSGRuleProtocol = $rule.Protocol
Write-Host "NSGRuleProtocol" NSGRuleProtocol
foreach ($sport in $rule.SourcePortRange) {
if ($sport -ne $rule.SourcePortRange[0]) {
$sport = $sport + ";" + $sport
}
$NSGRuleSourcePortRange = $sport
Write-Host "NSGRuleSourcePortRange" $NSGRuleSourcePortRange
}
foreach ($dport in $rule.DestinationPortRange) {
if ($dport -ne $rule.DestinationPortRange[0]) {
$dport = $dport + ";" + $dport
}
$NSGRuleDestinationPortRange = $dport
Write-Host "NSGRuleDestinationPortRange" $NSGRuleDestinationPortRange
}
foreach ($sprefix in $rule.SourceAddressPrefix) {
if ($sprefix -ne $rule.SourceAddressPrefix[0]) {
$sprefix = $sprefix + ";" + $sprefix
}
$NSGRuleSourceAddressPrefix = $sprefix
Write-Host "NSGRuleSourceAddressPrefix" $NSGRuleSourceAddressPrefix
}
foreach ($dprefix in $rule.DestinationAddressPrefix) {
if ($dprefix -ne $rule.DestinationAddressPrefix[0]) {
$dprefix = $dprefix + ";" + $dprefix
}
$NSGRuleDestinationAddressPrefix = $dprefix
Write-Host "NSGRuleDestinationAddressPrefix" $NSGRuleDestinationAddressPrefix
}
If ($rule.SourceApplicationSecurityGroups[0] -ne $null) {
$NSGRuleSourceApplicationSecurityGroups = $rule.SourceApplicationSecurityGroups[0].id
[Array]$NSGRuleASGSourceArray = $NSGRuleSourceApplicationSecurityGroups.Split("/")
$NSGRuleSourceApplicationSecurityGroupName = $NSGRuleASGSourceArray[8]
Write-Host "NSGRuleSourceApplicationSecurityGroupName" $NSGRuleSourceApplicationSecurityGroupName
}
If ($rule.DestinationApplicationSecurityGroups[0] -ne $null) {
$NSGRuleDestinationApplicationSecurityGroups = $rule.DestinationApplicationSecurityGroups[0].id
[Array]$NSGRuleASGDestinationArray = $NSGRuleDestinationApplicationSecurityGroups.Split("/")
$NSGRuleDestinationApplicationSecurityGroupName = $NSGRuleASGDestinationArray[8]
Write-Host "NSGRuleDestinationApplicationSecurityGroupName" $NSGRuleDestinationApplicationSecurityGroupName
}
$NSGRuleAccess = $rule.Access
$NSGRulePriority = $rule.Priority
$NSGRuleDirection = $rule.Direction
Add-Content $LogFile $NSGName","$NSGRuleName","$NSGRuleProtocol","$NSGRuleSourcePortRange","$NSGRuleDestinationPortRange","$NSGRuleSourceAddressPrefix","$NSGRuleDestinationAddressPrefix","$NSGRuleSourceApplicationSecurityGroupName","$NSGRuleDestinationApplicationSecurityGroupName","$NSGRuleAccess","$NSGRulePriority","$NSGRuleDirection
}
}

Document Azure Routes

Not really my cup of tea (networking), but I recently had to pull the routes from a Azure infra project, so… bleagh:

Connect-AzureRmAccount
$Subscription = "<Subscription-GUID>"
$LogFile = "C:\<PATH>\RouteTables.csv"
If (Test-Path $Logfile) {
Clear-Content -Path $Logfile
}
Add-Content $Logfile "Name,ResourceGroupName,Location,RouteName,Id,Etag,ProvisioningState,AddressPrefix,NextHopType,NextHopIpAddress"
Set-AzureRmContext -Subscription $Subscription
$RTs = Get-AzureRmRouteTable
ForEach ($RT in $RTs) {
# Nullify all values
$RTName = $NULL
$RTResourceGroupName = $NULL
$RTLocation = $NULL
$RTRouteName = $NULL
$RTId = $NULL
$RTEtag = $NULL
$RTProvisioningState = $NULL
$RTAddressPrefix = $NULL
$RTNextHopType = $NULL
$RTNextHopIpAddress = $NULL
# Get route values
$RTName = $RT.Name
$RTResourceGroupName = $RT.ResourceGroupName
$RTLocation = $RT.Location
$RTRoutes = $RT.Routes
ForEach ($RTRoute in $RTRoutes) {
$RTRouteName = $RTRoute.Name
$RTId = $RTRoute.Id
$RTEtag = $RTRoute.Etag
$RTProvisioningState = $RTRoute.ProvisioningState
$RTAddressPrefix = $RTRoute.AddressPrefix
$RTNextHopType = $RTRoute.NextHopType
$RTNextHopIpAddress = $RTRoute.NextHopIpAddress
# Define output
[String]$RTInfo = $RTName + "," + $RTResourceGroupName + "," + $RTLocation + "," + $RTRouteName + "," + $RTId + "," + $RTEtag + "," + $RTProvisioningState + "," + $RTAddressPrefix + "," + $RTNextHopType + "," + $RTNextHopIpAddress
Write-Host $RTInfo
# Write output to file
Add-Content $Logfile $RTInfo
}
}


Azure Service Principle Authentication

I have recently been working within a client where all Azure/ Office 365 users must perform MFA on logon.

Ages ago I posted about using credential manager to automate Office 365 scripts: https://blog.oholics.net/using-credential-manager-to-authenticate-office-365-scripts/. This method will clearly not suffice where MFA is enforced, as there is no mechanism to allow MFA challenge and response.

Recently I have been looking into using Azure Service Principle objects to bypass MFA and to allow scripts, that need to connect to Azure or other services, to do so without input. Thus, I can then schedule scripted tasks to generate reports on Azure AD objects or AzureRM items.

Firstly I need to create some certificates, these will be used to authenticate, see here: https://blog.oholics.net/creating-simple-ssl-certificates-for-server-authentication-using-openssl/ for details on certificate creation.

Next, once we have the PFX certificate file, we can create the Azure App Registration, using PowerShell:

$Subscription = "<Subscription-GUID>"
$PathToPFXCertificate = "C:\<PATH>\<CertName>.pfx"
$PFXPassword = "<Password>"
$CertPassword = ConvertTo-SecureString $PFXPassword -AsPlainText -Force
$ApplicationName = "<AppName>"
Import-Module AzureRM.Resources
Connect-AzureRmAccount
Set-AzureRmContext -Subscription $Subscription
$PFXCert = New-Object -TypeName System.Security.Cryptography.X509Certificates.X509Certificate2 -ArgumentList @($PathToPFXCertificate, $CertPassword)
$KeyValue = [System.Convert]::ToBase64String($PFXCert.GetRawCertData())
$ServicePrincipal = New-AzureRMADServicePrincipal -DisplayName $ApplicationName
New-AzureRmADSpCredential -ObjectId $ServicePrincipal.Id -CertValue $KeyValue -StartDate $PFXCert.NotBefore -EndDate $PFXCert.NotAfter

Then (optionally), if the script that you want to automate will be reading AzureRM objects, run the following script. Note that if the role assignment is to be constrained to a specific resource group, add the  -ResourceGroupName switch to New-AzureRMRoleAssignment

$Subscription = "<Subscription-GUID>"
$ApplicationName = "<AppName>"
$ServicePrincipal = Get-AzureRMADServicePrincipal -DisplayName $ApplicationName
Set-AzureRmContext -Subscription $Subscription
$NewRole = $null
$Retries = 0;
While ($NewRole -eq $null -and $Retries -le 6) {
Sleep 15
New-AzureRMRoleAssignment -ResourceGroupName -RoleDefinitionName Reader -ServicePrincipalName $ServicePrincipal.ApplicationId | Write-Verbose -ErrorAction SilentlyContinue
$NewRole = Get-AzureRMRoleAssignment -ObjectId $ServicePrincipal.Id -ErrorAction SilentlyContinue
$Retries++;
}
$NewRole

Additionally, the RoleDefinitionName can be altered to suit.

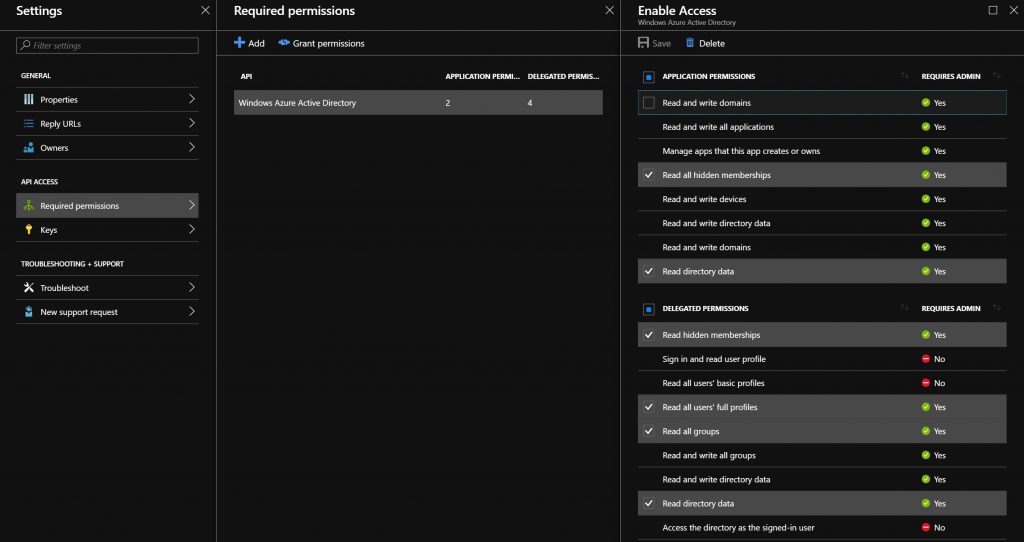
Now we have the Service Principle in place, we can connect! But in the case of the Azure AD connection, I need to first allow the application to Read AAD:

Go to the App Registrations blade in Azure AD, pick the application created earlier, then select settings. Select Required Permissions, add Azure AD and add the permissions shown in the following image:

Now lets connect using the certificate thumbprint:

$TenantId = "<AzureADTenantID>"
$ApplicationId = "<AppID>"
$Cert=Get-ChildItem cert:\CurrentUser\My\"<CertificateThumbprint>"
# Connect to Azure AD:
Connect-AzureAD -TenantId $TenantId -ApplicationId $ApplicationId -CertificateThumbprint $Cert.Thumbprint
# e.g. Get-AzureADUsers
# Connect to AzureRM:
Connect-AzureRmAccount -CertificateThumbprint $Cert.Thumbprint -ApplicationId $ApplicationId -Tenant $TenantId -ServicePrincipal
# e.g. Get-AzureRMResourceGroup

By installing the certificate in the CurrentUser store, only that user can consume the certificate thumbprint for authentication using this method. Lovely.. 🙂

Why is this method secure?

  • You can only access the application to sign in if you have installed the certificate on the machine that you want to run the script from.
  • To install the certificate, you must know the password that was set on the private key during PFX creation.
  • No AAD user object is created
  • No plain text passwords need to be stored

To sign in using this method, you must know:

  1. The AAD Tenant GUID
  2. The Application GUID of the configured application
  3. The specific thumbprint of the certificate, used to make the connection
  4. The certificate and private key must be installed on the machine on which the connection attempt is being made.

Can’t rename, move or delete an OU

Today, I came across something that had me quite stumped…. well for a few minutes anyway 🙂

I was doing some tidying up of a domain, I found an OU that was incorrectly named, it was not to design. I thought, I’ll just rename it, but found that the option to do so was not available.

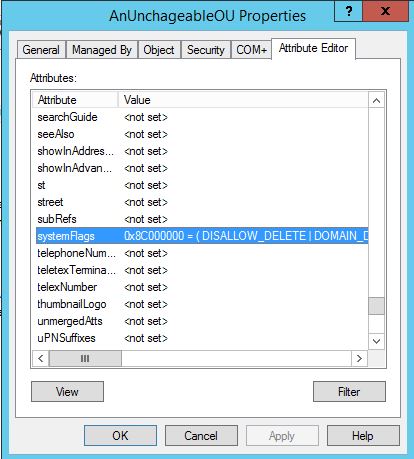
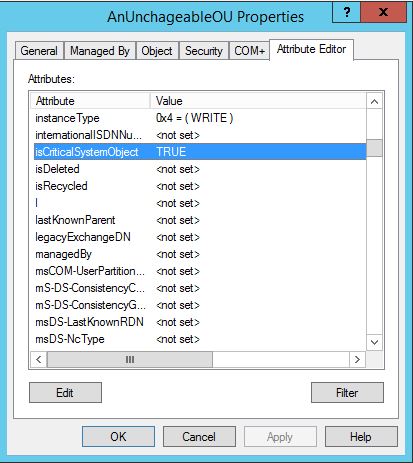
I took a look at the attributes of the OU, two immediately struck me as odd:

systemFlags was set to DISALLOW_DELETE|DOMAIN_DISALLOW_RENAME|DOMAIN_DISALLOW_MOVE


isCriticalSystemObject was set to TRUE:


Neither of these attributes could be modified, an error was thrown if attempted.

The simple answer: This OU had been set as the default location for new computer objects via redircmp 

By running redircmp CN=Computers,DC=oholics,DC=net (or your other true destination):

  • The systemFlags attribute was banished
  • The isCriticalSystemObject attribute was set to FALSE
  • The OU could be renamed, moved and deleted 😉

Creating simple SSL certificates for server authentication using OpenSSL

It is often useful to have a standalone and reliable process for provisioning SSL certificates, using an existing CA (internal or public) for use on enterprise servers.

This process makes use of OpenSSL, the Windows binaries for which can be found here: https://slproweb.com/products/Win32OpenSSL.html

Once installed, use an administrative command prompt and navigate to C:\OpenSSL-Win64\bin.

Use the following OpenSSL configuration file (backup the original first) in the bin directory:

#
# OpenSSL example configuration file.
# This is mostly being used for generation of certificate requests.
#
# This definition stops the following lines choking if HOME isn't
# defined.
HOME = .
RANDFILE = $ENV::HOME/.rnd
# Extra OBJECT IDENTIFIER info:
#oid_file = $ENV::HOME/.oid
oid_section = new_oids
# To use this configuration file with the "-extfile" option of the
# "openssl x509" utility, name here the section containing the
# X.509v3 extensions to use:
# extensions =
# (Alternatively, use a configuration file that has only
# X.509v3 extensions in its main [= default] section.)
[ new_oids ]
# We can add new OIDs in here for use by 'ca', 'req' and 'ts'.
# Add a simple OID like this:
# testoid1=1.2.3.4
# Or use config file substitution like this:
# testoid2=${testoid1}.5.6
# Policies used by the TSA examples.
tsa_policy1 = 1.2.3.4.1
tsa_policy2 = 1.2.3.4.5.6
tsa_policy3 = 1.2.3.4.5.7
####################################################################
[ ca ]
default_ca = CA_default # The default ca section
####################################################################
[ CA_default ]
dir = ./demoCA # Where everything is kept
certs = $dir/certs # Where the issued certs are kept
crl_dir = $dir/crl # Where the issued crl are kept
database = $dir/index.txt # database index file.
#unique_subject = no # Set to 'no' to allow creation of
# several ctificates with same subject.
new_certs_dir = $dir/newcerts # default place for new certs.
certificate = $dir/cacert.pem # The CA certificate
serial = $dir/serial # The current serial number
crlnumber = $dir/crlnumber # the current crl number
# must be commented out to leave a V1 CRL
crl = $dir/crl.pem # The current CRL
private_key = $dir/private/cakey.pem# The private key
RANDFILE = $dir/private/.rand # private random number file
x509_extensions = usr_cert # The extentions to add to the cert
# Comment out the following two lines for the "traditional"
# (and highly broken) format.
name_opt = ca_default # Subject Name options
cert_opt = ca_default # Certificate field options
# Extension copying option: use with caution.
# copy_extensions = copy
# Extensions to add to a CRL. Note: Netscape communicator chokes on V2 CRLs
# so this is commented out by default to leave a V1 CRL.
# crlnumber must also be commented out to leave a V1 CRL.
# crl_extensions = crl_ext
default_days = 365 # how long to certify for
default_crl_days= 30 # how long before next CRL
default_md = default # use public key default MD
preserve = no # keep passed DN ordering
# A few difference way of specifying how similar the request should look
# For type CA, the listed attributes must be the same, and the optional
# and supplied fields are just that :-)
policy = policy_match
# For the CA policy
[ policy_match ]
countryName = match
stateOrProvinceName = match
organizationName = match
organizationalUnitName = optional
commonName = supplied
emailAddress = optional
# For the 'anything' policy
# At this point in time, you must list all acceptable 'object'
# types.
[ policy_anything ]
countryName = optional
stateOrProvinceName = optional
localityName = optional
organizationName = optional
organizationalUnitName = optional
commonName = supplied
emailAddress = optional
####################################################################
[ req ]
default_bits = 2048
default_keyfile = privkey.pem
distinguished_name = req_distinguished_name
attributes = req_attributes
x509_extensions = v3_ca # The extentions to add to the self signed cert
# Passwords for private keys if not present they will be prompted for
# input_password = secret
# output_password = secret
# This sets a mask for permitted string types. There are several options.
# default: PrintableString, T61String, BMPString.
# pkix : PrintableString, BMPString (PKIX recommendation before 2004)
# utf8only: only UTF8Strings (PKIX recommendation after 2004).
# nombstr : PrintableString, T61String (no BMPStrings or UTF8Strings).
# MASK:XXXX a literal mask value.
# WARNING: ancient versions of Netscape crash on BMPStrings or UTF8Strings.
string_mask = utf8only
req_extensions = v3_req # The extensions to add to a certificate request
[client_server_ssl]
extendedKeyUsage = serverAuth
[ req_distinguished_name ]
countryName = Country Name (2 letter code)
countryName_default = GB
countryName_min = 2
countryName_max = 2
stateOrProvinceName = State or Province Name (full name)
stateOrProvinceName_default = London
localityName = Locality Name (eg, city)
localityName_default = London
0.organizationName = Organization Name (eg, company)
0.organizationName_default = MyOrg
# we can do this but it is not needed normally :-)
#1.organizationName = Second Organization Name (eg, company)
#1.organizationName_default = N/A
organizationalUnitName = Organizational Unit Name (eg, section)
organizationalUnitName_default = MyOrg
commonName = Common Name (e.g. server FQDN or YOUR name)
commonName_max = 64
#emailAddress = Email Address
#emailAddress_max = 64
# SET-ex3 = SET extension number 3
[ req_attributes ]
challengePassword = A challenge password
challengePassword_min = 4
challengePassword_max = 20
#unstructuredName = An optional company name
[ usr_cert ]
# These extensions are added when 'ca' signs a request.
# This goes against PKIX guidelines but some CAs do it and some software
# requires this to avoid interpreting an end user certificate as a CA.
basicConstraints=CA:FALSE
# Here are some examples of the usage of nsCertType. If it is omitted
# the certificate can be used for anything *except* object signing.
# This is OK for an SSL server.
# nsCertType = server
# For an object signing certificate this would be used.
# nsCertType = objsign
# For normal client use this is typical
# nsCertType = client, email
# and for everything including object signing:
# nsCertType = client, email, objsign
# This is typical in keyUsage for a client certificate.
# keyUsage = nonRepudiation, digitalSignature, keyEncipherment
# This will be displayed in Netscape's comment listbox.
nsComment = "OpenSSL Generated Certificate"
# PKIX recommendations harmless if included in all certificates.
subjectKeyIdentifier=hash
authorityKeyIdentifier=keyid,issuer
# This stuff is for subjectAltName and issuerAltname.
# Import the email address.
# subjectAltName=email:copy
# An alternative to produce certificates that aren't
# deprecated according to PKIX.
# subjectAltName=email:move
# Copy subject details
# issuerAltName=issuer:copy
#nsCaRevocationUrl = http://www.domain.dom/ca-crl.pem
#nsBaseUrl
#nsRevocationUrl
#nsRenewalUrl
#nsCaPolicyUrl
#nsSslServerName
# This is required for TSA certificates.
# extendedKeyUsage = critical,timeStamping
[ v3_req ]
# Extensions to add to a certificate request
basicConstraints = CA:FALSE
keyUsage = nonRepudiation, digitalSignature, keyEncipherment
#extendedKeyUsage = 1.3.6.1.5.5.7.3.1
extendedKeyUsage = serverAuth
subjectAltName = @alt_names
[alt_names]
DNS.1 = <SAN1> #This SAN should match the CN of your certificate
DNS.2 = <SAN2>
DNS.3 = <SAN3>
[ v3_ca ]
# Extensions for a typical CA
# PKIX recommendation.
subjectKeyIdentifier=hash
authorityKeyIdentifier=keyid:always,issuer
# This is what PKIX recommends but some broken software chokes on critical
# extensions.
#basicConstraints = critical,CA:true
# So we do this instead.
basicConstraints = CA:true
# Key usage: this is typical for a CA certificate. However since it will
# prevent it being used as an test self-signed certificate it is best
# left out by default.
# keyUsage = cRLSign, keyCertSign
# Some might want this also
# nsCertType = sslCA, emailCA
# Include email address in subject alt name: another PKIX recommendation
# subjectAltName=email:copy
# Copy issuer details
# issuerAltName=issuer:copy
# DER hex encoding of an extension: beware experts only!
# obj=DER:02:03
# Where 'obj' is a standard or added object
# You can even override a supported extension:
# basicConstraints= critical, DER:30:03:01:01:FF
[ crl_ext ]
# CRL extensions.
# Only issuerAltName and authorityKeyIdentifier make any sense in a CRL.
# issuerAltName=issuer:copy
authorityKeyIdentifier=keyid:always
[ proxy_cert_ext ]
# These extensions should be added when creating a proxy certificate
# This goes against PKIX guidelines but some CAs do it and some software
# requires this to avoid interpreting an end user certificate as a CA.
basicConstraints=CA:FALSE
# Here are some examples of the usage of nsCertType. If it is omitted
# the certificate can be used for anything *except* object signing.
# This is OK for an SSL server.
# nsCertType = server
# For an object signing certificate this would be used.
# nsCertType = objsign
# For normal client use this is typical
# nsCertType = client, email
# and for everything including object signing:
# nsCertType = client, email, objsign
# This is typical in keyUsage for a client certificate.
# keyUsage = nonRepudiation, digitalSignature, keyEncipherment
keyUsage = digitalSignature, keyEncipherment
# This will be displayed in Netscape's comment listbox.
nsComment = "OpenSSL Generated Certificate"
# PKIX recommendations harmless if included in all certificates.
subjectKeyIdentifier=hash
authorityKeyIdentifier=keyid,issuer
# This stuff is for subjectAltName and issuerAltname.
# Import the email address.
# subjectAltName=email:copy
# An alternative to produce certificates that aren't
# deprecated according to PKIX.
# subjectAltName=email:move
# Copy subject details
# issuerAltName=issuer:copy
#nsCaRevocationUrl = http://www.domain.dom/ca-crl.pem
#nsBaseUrl
#nsRevocationUrl
#nsRenewalUrl
#nsCaPolicyUrl
#nsSslServerName
# This really needs to be in place for it to be a proxy certificate.
proxyCertInfo=critical,language:id-ppl-anyLanguage,pathlen:3,policy:foo
####################################################################
[ tsa ]
default_tsa = tsa_config1 # the default TSA section
[ tsa_config1 ]
# These are used by the TSA reply generation only.
dir = ./demoCA # TSA root directory
serial = $dir/tsaserial # The current serial number (mandatory)
crypto_device = builtin # OpenSSL engine to use for signing
signer_cert = $dir/tsacert.pem # The TSA signing certificate
# (optional)
certs = $dir/cacert.pem # Certificate chain to include in reply
# (optional)
signer_key = $dir/private/tsakey.pem # The TSA private key (optional)
default_policy = tsa_policy1 # Policy if request did not specify it
# (optional)
other_policies = tsa_policy2, tsa_policy3 # acceptable policies (optional)
digests = md5, sha1 # Acceptable message digests (mandatory)
accuracy = secs:1, millisecs:500, microsecs:100 # (optional)
clock_precision_digits = 0 # number of digits after dot. (optional)
ordering = yes # Is ordering defined for timestamps?
# (optional, default: no)
tsa_name = yes # Must the TSA name be included in the reply?
# (optional, default: no)
ess_cert_id_chain = no # Must the ESS cert id chain be included?
# (optional, default: no)

Edit line 232 to define the first SAN for the certificate, this should match the common name of your certificate. Add further SAN’s in the subsequent lines.

For example, if my server advertised DNS name is blog.oholics.net, but I also want the root domain to be added as a SAN, then DNS.1 = blog.oholics.net and DNS.2 = oholics.net.

Run the following commands.

Generate the private key:

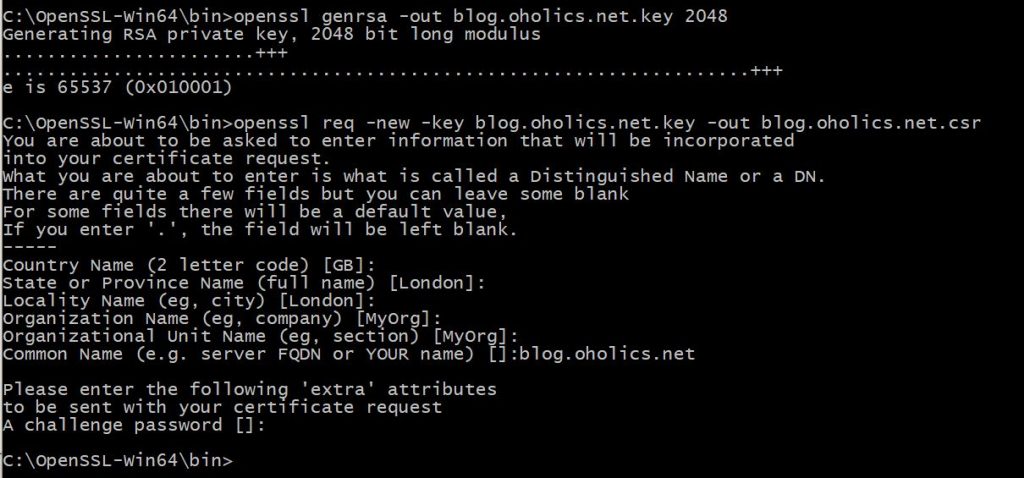
  • openssl genrsa -out blog.oholics.net.key 2048 (note: amend the numbits value as appropriate)

Generate the CSR, amending the country name and other values as appropriate, add the CN of the server when prompted:

  • openssl req -new -key blog.oholics.net.key -out blog.oholics.net.csr

Validate the CSR – check that the SAN’s are correct

  • openssl req -in blog.oholics.net.csr -noout -text

Once happy, submit the CSR to your CA. Wait for the response, save the file as blog.oholics.net.crt

Now, to combine the certificate file and the private key into a pfx file (providing a secure password when prompted):

openssl pkcs12 -export -out blog.oholics.net.pfx -inkey blog.oholics.net.key -in blog.oholics.net.crt -certfile blog.oholics.net.crt

Use the resulting file as you desire 🙂

PowerShell Module for AD/ ADLDS Schema modification

A couple of years ago a colleague within my company (Avanade) published a link to a GitHub project that he had just completed: https://github.com/SchneiderAndy/ADSchema

I had just finished working on a project using MIM to synchronise identities and groups from two domains into one Microsoft ADLDS instance, using the ProxyUser class to allow ADLDS to become a common authenticator for a divestment. While proving out the solution, the target ADLDS instance was trashed and rebuilt countless times. The rebuilds were time consuming and boring. With this use case in mind, I took a fork of Andy’s solution and spent a few months (off and on) to modify the module to allow its use against ADLDS, as the methods used to interact with ADLDS were often very different.

My version of the module can be found here: https://github.com/jkbryan/ADSchema, the detailed usage examples are detailed in the readme file.

If you want to give it a try, please, please test against something non-production! I will not be held responsible for any mistakes made while using the module. Test, test and test again before using it in a production environment!

Time flies when you are having fun!

Ha-ha! only one year (and a bit later) I finally finished the tidy up. All code samples are now in github gists. Crayon Syntax Highlighter is no more, it was a good plugin, but time for something better.

I found some odd formatting issues in some of the code samples. I reckon most of these are a legacy from when the blog was running on a Raspberry Pi and the cheap 4GB SD cards the the blog was running on were getting corrupted almost once a week. I used to spend hours every week recovering either the database or the entire disk image. Ahhh, such fond memories :), but a great way to learn.

It has been a super busy year, learning some new stuff focused on Azure infrastructure, Azure RBAC and AAD authentication to legacy applications. I’ll publish some content related to these activities soon.

Migration complete

I’m pleased to say that I have now finalised the migration of content from fim.oholics.net, script.oholics.net, rpi.oholics.net and 365.oholics.net into this new blog site. All re-directors/ etc. appear to be working as planned.

I have noticed a few formatting issues with the Crayon syntax highlighter plugin on some posts, so have migrated those that were ‘broken’ to GitHub Gists. I’ll eventually migrate all of the code samples/ snippets to Gists, as they should display more consistently and remove the need for rendering each sample by WordPress.