Certificate Management

My Very Own CA, How Sweet :)

Just splurging this down here for next time, as I had to go trawling for this info in various old text files today… Very related to https://blog.oholics.net/creating-simple-ssl-certificates-for-server-authentication-using-openssl/, but using my own CA rather than an enterprise or public CA.

I was working in my lab today to setup SLDAP on my lab domain controller. I was doing this to validate the syntax of ldapsearcher, on a Ubuntu machine, in different cases and also to see if I could determine the reason I was seeing a particular error (see https://blog.oholics.net/ldapsearch-syntax-for-simple-ldap-and-sldap/).

I want to KISS (keep things simple stupid), so was going to use the rootCA that I setup with OpenSSL a few years ago (running on my Windows machine).

Back then I ran the following commands to create the “top level” Root CA certificate and Private Key:

openssl genrsa -out rootCA.key 2048
openssl req -x509 -new -nodes -key rootCA.key -sha256 -days 1024 -out rootCA.pem

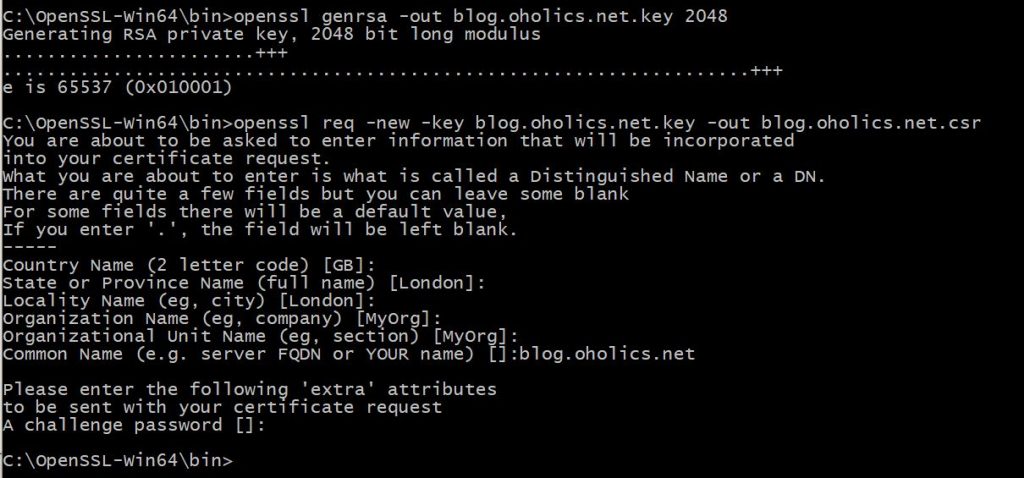
To generate my domain controller certificate today, I used (with an edited openssl.conf file of course):

openssl genrsa -out dc.oholics.net.key 2048
openssl req -new -key dc.oholics.net.key -out dc.oholics.net.csr
openssl x509 -req -in dc.oholics.net.csr -CA rootCA.pem -CAkey rootCA.key -CAcreateserial -out dc.oholics.net.crt -days 500 -sha256
openssl pkcs12 -export -out dc.oholics.net.pfx -inkey dc.oholics.net.key -in dc.oholics.net.crt -certfile dc.oholics.net.crt

On the domain controller, I installed the dc.oholics.net.pfx file into the computer personal store and the rootCA.pem into the computer trusted root certification authorities store. Reboot and done..

###################################################################################

Minor edit…. I originally created the root certificate a rather long time ago… Today I discovered it was expired, thus the few certificates issued by it are also fubared.

Simple fix (where I don’t have to publish anything very far or wide):

Regenerate the rootCA certificate using the original key:

openssl req -x509 -new -nodes -key rootCA.key -sha256 -days 10240 -out rootCA.pem

Then start re-issuing those certificates that I was actually using (again using the keys and csr’s previously used:

openssl x509 -req -in MyImportantCert.csr -CA rootCA.pem -CAkey rootCA.key -CAcreateserial -out MyImportantCert.crt -days 5000 -sha256

openssl pkcs12 -export -out MyImportantCert.pfx -inkey MyImportantCert.key -in MyImportantCert.crt -certfile MyImportantCert.crt

Note the extra 0’s on the number of valid days, shouldn’t have to do this again for a good while 🙂

Creating simple SSL certificates for server authentication using OpenSSL

It is often useful to have a standalone and reliable process for provisioning SSL certificates, using an existing CA (internal or public) for use on enterprise servers.

This process makes use of OpenSSL, the Windows binaries for which can be found here: https://slproweb.com/products/Win32OpenSSL.html

Once installed, use an administrative command prompt and navigate to C:\OpenSSL-Win64\bin.

Use the following OpenSSL configuration file (backup the original first) in the bin directory:

Edit line 232 to define the first SAN for the certificate, this should match the common name of your certificate. Add further SAN’s in the subsequent lines.

For example, if my server advertised DNS name is blog.oholics.net, but I also want the root domain to be added as a SAN, then DNS.1 = blog.oholics.net and DNS.2 = oholics.net.

Run the following commands.

Generate the private key:

  • openssl genrsa -out blog.oholics.net.key 2048 (note: amend the numbits value as appropriate)

Generate the CSR, amending the country name and other values as appropriate, add the CN of the server when prompted:

  • openssl req -new -key blog.oholics.net.key -out blog.oholics.net.csr

Validate the CSR – check that the SAN’s are correct

  • openssl req -in blog.oholics.net.csr -noout -text

Once happy, submit the CSR to your CA. Wait for the response, save the file as blog.oholics.net.crt

Now, to combine the certificate file and the private key into a pfx file (providing a secure password when prompted):

openssl pkcs12 -export -out blog.oholics.net.pfx -inkey blog.oholics.net.key -in blog.oholics.net.crt -certfile blog.oholics.net.crt

Use the resulting file as you desire 🙂

Replacing the ADFS Service Certificate

The initial service certificate used for my ADFS service was relatively simplistic – containing only one UPN suffix.

Recently, the security team stated that they wished to start using InTune, via SCCM. Thus, I needed to enable the Workplace Join functionality on the ADFS server farm.

In order to do so, I obtained a new certificate with the additional SAN: enterpriseregistration.<MyDomain>, then I needed to replace the service certificate on the ADFS servers in the farm. This process was followed:

  1. Install new certificate on all ADFS servers in the farm
  2. Allow the ADFS service account read permissions on the private key
  3. On the Primary ADFS server, set the new service certificate
  4. Obtain the certificate thumbprint from the new certificate, e.g.: xxxxxxxxxxxxxxxxxxxxxxxxxxxxxxxxxxxxxxxxx
  5. On all ADFS proxy servers – Set-WebApplicationProxySslCertificate -Thumbprint: xxxxxxxxxxxxxxxxxxxxxxxxxxxxxxxxxxxxxxxxx
  6. On the Primary ADFS server – Set-AdfsSslCertificate -Thumbprint: xxxxxxxxxxxxxxxxxxxxxxxxxxxxxxxxxxxxxxxxx
  7. Restart ADFS service on all servers

8. Test, by doing a federated login via portal.microsoftonline.com