PowerShell

Entra ID API Based Inbound Provisioning and Complex Attribute Flows

I’ve been setting up Entra ID and Active Directory API based inbound provisioning in my demo environment recently, using the PowerShell method described here API-driven inbound provisioning with PowerShell script – Microsoft Entra ID | Microsoft Learn. I’ll split this post into 2 parts and will focus only on Entra ID API Inbound Provisioning, as there are only a few differences in AD provisioning – e.g. different attributes and setup of the agent/ CloudSync:

Post setup: Customisation, Lessons Learnt and Troubleshooting

I carried out the initial setup of the enterprise app and manage identity according to the above-mentioned documentation.

Using the example files from the GitHub repo: https://github.com/AzureAD/entra-id-inbound-provisioning/tree/main/PowerShell, I created my own “HR” data file, one line of which is shown here:

I wanted to consume the employee HireDate, LeaveDate, Pronouns, TempLeave and UsageLocation attributes too. However, as these are not part of the default SCIM user definition, I extended my Attribute Mapping file with these extra mappings, using my domain as the identifier “urn:ietf:params:scim:schemas:extension:oholics:2.0:User“. The full mapping file is here:

To consume these custom attributes, you must add them to the Enterprise Application, in the Provisioning section. Tick “Show advanced options” and select “Edit attribute list for API”, add as shown:

Note that the PowerShell script has functionality to automate this process based on the headers of your CSV file, but given that there were only 4 attributes to define, I did it manually.

OK, on to running the PowerShell commands to see the results:

First import the Attribute Mapping file:

$AttributeMapping = Import-PowerShellDataFile .\AttributeMapping.psd1

Then validate the Mapping file and the input CSV file:
.\CSV2SCIM.ps1 -path .\UserSample.csv -AttributeMapping $AttributeMapping -ValidateAttributeMapping

Run the command to process the users in the CSV file (I suggest doing one user at a time until you are confident in your configuration):
.\CSV2SCIM.ps1 -path .\UserSample.csv -AttributeMapping $AttributeMapping -TenantId <MyEntrIDTenantID> -ServicePrincipalId <ObjectIDOfEnterpriseApplication>

Within a few seconds you should see that a new user is provisioned into Entra ID, with all the attributes set. OK all good! If not, check the provisioning log to see some ‘issues’ 😉

Note that my example CSV file has diacritics, as I wanted to see how the application dealt with these. A few of my initial runs (single user provisioning) ran without issue, generally these were those without diacritics, but then I had a few issues that had me stumped for a while.

The first error was presented in the provisioning log as:
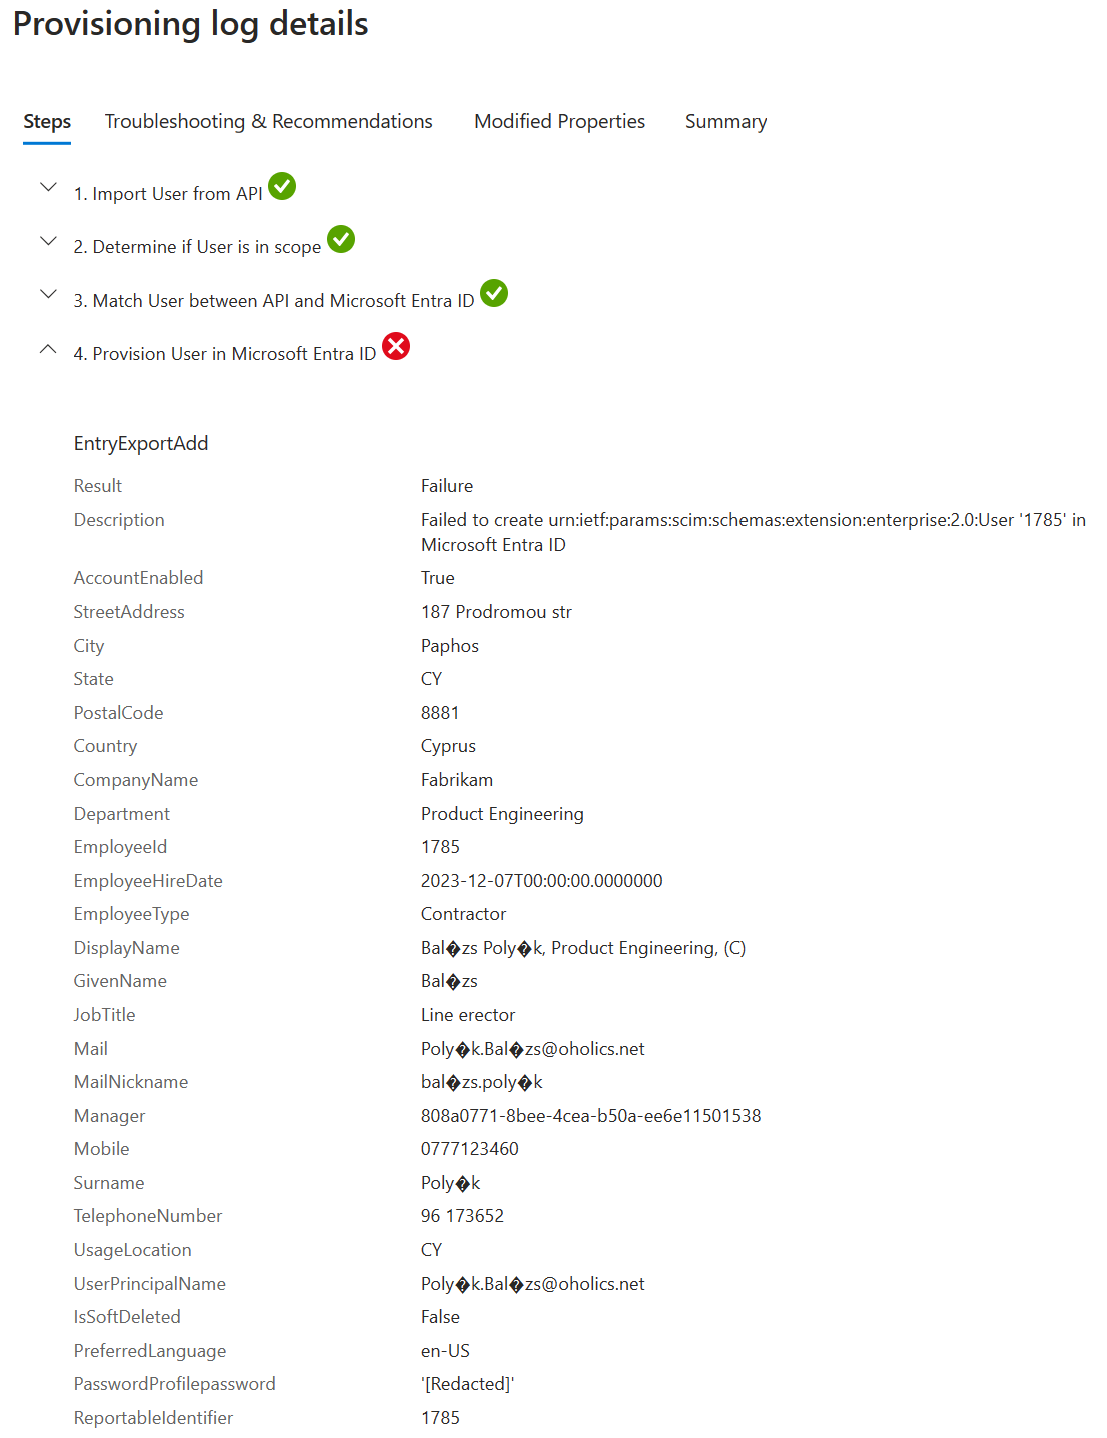
The primary cause of this error was the format of the CSV file. Make sure that the file is in UTF-8, flipping between UTF-8 and ANSI results in: mastná : mastnÃ

Additionally, I had to modify some flow rules to remove diacritics – notably Mail, MailNickName and UserPrincipalName; these are detailed in the next section.

The second error was presented in the provisioning log as:
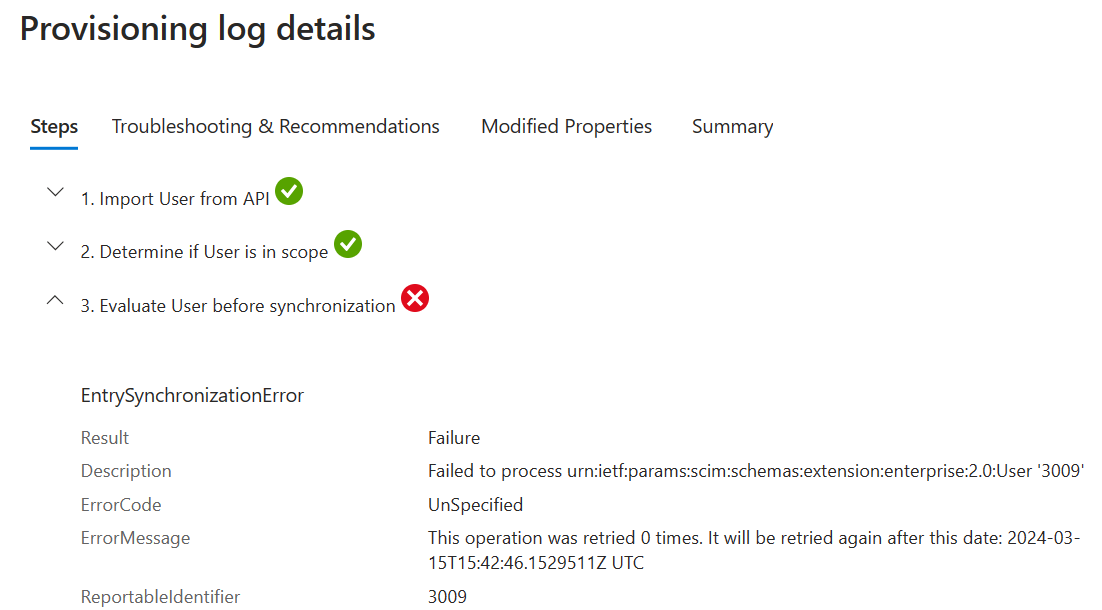


This one was a lot more annoying, but the solution was of course very simple! The error provided no clues, the other provisioning logs in Entra ID did not yield anything useful, so I started picking through each attribute, using a known good example user, who I’d already provisioned. By outputting a json file for the users (good and bad) using the command:

.\CSV2SCIM.ps1 -path .\UserSample.csv -AttributeMapping $AttributeMapping > UserSample.json

I then picked through/ copy and pasted the values between the good and bad user json file and submitted them directly using Graph Explorer – see here for details: https://learn.microsoft.com/en-us/entra/identity/app-provisioning/inbound-provisioning-api-graph-explorer

After exhausting all ‘normal’ attributes, I copied the hiredate and leavedate from my good user example…. it worked!! WTH??? So, what was the difference?

The dates in my good user file happened to have the format 04/03/2011, the dates in my bad user file had the format 19/04/2011, so what is the problem?? The application expects American date formatted dates! So in my good example, the date can be read as UK or US, but in the bad user, the date is clearly UK style. That was painful, especially as after every submission (even using Graph Explorer), you have to wait for a few minutes for the success or failure message to appear.

An example of the output for my test user (as provided in the sample CSV file) is shown (this one is fixed after debugging the issues with date etc.):

Defining more complex attribute flows

The default flows that are provided after configuring the application are OK, but kind of generic and miss some other attributes that you’d typically want to use/ populate (e.g. Usage Location).

Looking at the MSFT documentation https://learn.microsoft.com/en-us/entra/identity/app-provisioning/functions-for-customizing-application-data shows the general rules of the different expressions, but doesn’t provide much guidance on how to combine expressions to meet more complex requirements. I dug around, but couldn’t find any good examples, so I’ll provide some here.

My initial attempt at defining a user Display Name, built from a set of attributes which were present took a while.

Example: Display Name should be: <FirstName>” “<Surname>”, “<Pronouns>”, “<Department> 

So the flow needs to check that the attributes are present, else you may end up with a Display Name that looks like: FirstName Surname,, Department

Initially, I tried using the Switch(IsPresent) expression, but kept getting null results, as it only seemed to evaluate the first attribute. I moved onto nested IIF, but again did not get the results that I wanted.

Digging through the issues on the GitHub page https://github.com/MicrosoftDocs/entra-docs/issues/120, I noted reference to https://learn.microsoft.com/en-us/entra/identity/app-provisioning/hr-user-creation-issues, where the use of IgnoreFlowIfNullOrEmpty was suggested. Initial testing of this method was good, with the following resultant flow rule, which joins the attributes only if they exist.

The green section takes the FirstName and Surname and joins them with a Space

The blue section Joins the green section, the Pronouns and the Department with a Comma

Join(“, “, Join(” “, IgnoreFlowIfNullOrEmpty([name.givenName]), IgnoreFlowIfNullOrEmpty([name.familyName])), IgnoreFlowIfNullOrEmpty([urn:ietf:params:scim:schemas:extension:oholics:2.0:User:pronouns]), IgnoreFlowIfNullOrEmpty([urn:ietf:params:scim:schemas:extension:enterprise:2.0:User:department]))

Some more examples:

Email address/ UserPrincipalName:

The green section takes the FirstName and Surname trims any spaces and sets to lowercase (HR Data cleansing) and joins them with a Space

The blue section Appends the domain name to the green section

Append(Join(“.”, Trim(ToLower(NormalizeDiacritics([name.familyName]), )), Trim(ToLower(NormalizeDiacritics([name.givenName]), ))), “@oholics.net”)


MailNickName:

The green section removes diacritics from the userName and sets to lowercase (HR Data cleansing), where userName is defined in the input file as firstname.surname (with diacritics)

The blue section removes any suffixes/ characters after an @ symbol.

Replace(ToLower(NormalizeDiacritics([userName]), ), , “(?<Suffix>@(.)*)”, “Suffix”, “”, , )


Displayname, with a nested IIF statement:

The green section takes the FirstName and Surname and joins them with a Space

The blue section Joins the green section, the Department and the orange section with a Comma

The orange section creates a “(C)” if the user is a Contractor and an “(E)” if the user is an Employee. If the data is missing or not one of those values, then that section of the display name is omitted.

Join(“, “, Join(” “, IgnoreFlowIfNullOrEmpty([name.givenName]), IgnoreFlowIfNullOrEmpty([name.familyName])), IgnoreFlowIfNullOrEmpty([urn:ietf:params:scim:schemas:extension:enterprise:2.0:User:department]), IgnoreFlowIfNullOrEmpty(IIF([userType]=”Contractor”,”(C)”,IIF([userType]=”Employee”,”(E)”,””))))


Depending on how happy you are with your input HR data, you could go a bit crazy with data hygiene. From my FIM/ MIM days, I got burned so many times with bad HR data, I got in the habit of always performing hygiene on my import flows. That’s all for now.

Can I copy an Entra ID Role? No!

I did this, so you don’t have to 🙂 I’d read that it wasn’t possible, but had to see what happened out of interest!

I tried to copy the Exchange Administrator role, by taking the existing permissions of that role and squirting them into a POSH script to create a custom role.

The result: many errors like shown stating that the action is not supported on a custom role.

Below is a copy of the script showing all of the permissions that I had to remove (note all the commented permissions lines) before being able to create the role.
For reference here is a link to MSFT docs that show what you CAN set in Entra ID custom roles: User management permissions for Microsoft Entra custom roles – Microsoft Entra ID | Microsoft Learn

Scripted Provisioning of Office 365 Unified Labels

I’ve recently been working on a project implementing O365 unified Labels, in a greenfield scenario where programmatic provisioning of the configuration was required.

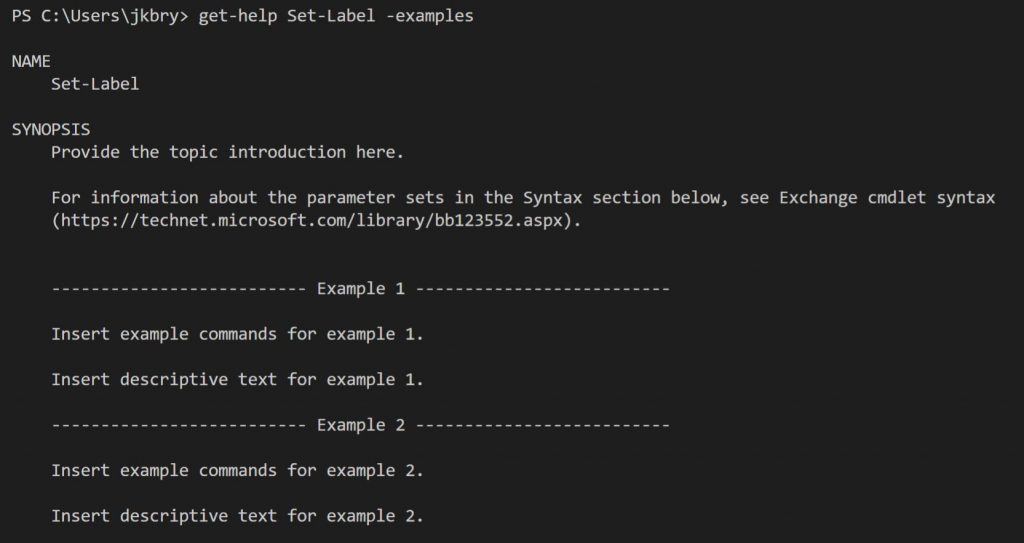
Some of the Microsoft documentation covering how to configure Unified Labels via PowerShell are good, while others are very weak. Take for example the Set-Label cmdlet with the -examples switch:

Se-Label -Examples

OK, that isn’t very helpful 🙂

Additionally, the online docs (e.g. https://docs.microsoft.com/en-us/powershell/module/exchange/policy-and-compliance/set-label?view=exchange-ps) fail to reference some of the cmdlet parameters .

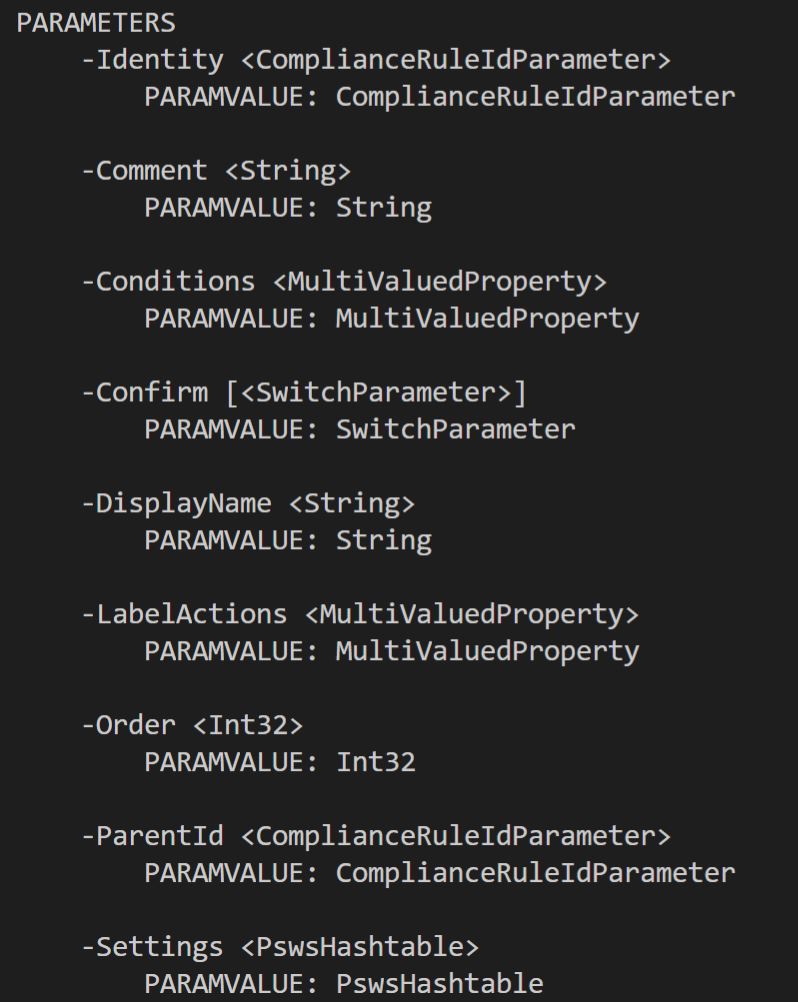
If we look at the parameters from the command “Get-Help Set-Label -Detailed”, we see:

Set-Label-Parameters

So the parameters that I wanted to set were LabelActions and Conditions. LabelActions configure headers, footers and watermarks, while Conditions define the O365 Sensitivity Types that are applied to a label.

The documentation for how to do this was non-existent, apart from some cryptic “Exchange” docs detailing how to define “MultiValuedProperty”, I was fairly stumped. I ended up up backwards engineering the configuration by setting it in the GUI, then capturing the Label in PowerShell. Once captured, look at the configuration of “Conditions” or LabelActions to see how those Properties are defined in the case of Unified Labelling.

The following script details how this all works together to create something useful. It provisions a new Label named “My Label”, with a green colour. Then it applies a header “HeaderText” and footer “FooterText” and then a watermark “WatermarkText”, all in Black and font size 10. Lastly it applies the O365 sensitivity types “ABA Routing Number” and “Argentina National Identity (DNI) Number” to the label, in Recommended mode.

Also covered for reference is the creation of a sub-label “My Sub Label”, beneath “My Label”.

Once the labels are defined, we need to publish them with a policy. First create the policy, providing the label names and scope, then apply any required advanced settings to the policy.

Note the script below assumes that the last session was ended, we need to login again – else just continue the previous session.

Finally, the documentation states that label priority follows this rule: “A lower integer value indicates a higher priority, the value 0 is the highest priority“. However, in practice the opposite is true.

Say for example you have the following labels “Public”, “Internal” and “Secret”; for the advanced setting “RequireDowngradeJustification” to apply as expected, (following the documentation) you would set “Secret” = 0, “Internal” = 1 and “Public” = 2. This actually has the opposite effect, making a downgrade from Secret to Public not raise the justification dialog box, while Public to Secret is classed as a downgrade; also the order of labels in the toolbar is the wrong way around. So the proper order should be: “Public” = 0, “Internal” = 1 and “Secret” = 2.

Additionally, the priority can get quite messed up if you have any existing labels or if you deploy the labels in the wrong order. Continuing from my example, but also throwing in 2 sub labels per top level label….

First connect (or continue the existing session), then get the current priorities. If they don’t match the output shown in the script, then start fixing them! Start by interactively running the priority settings for the top level labels (only do those that are not correct), starting with the highest values and working down. Check the priorities after each change.

Once the top level labels are correct, start fixing the sub labels (assuming they are not right). Reset them individually, again setting the highest value first, check the priorities after each change. Rinse and repeat until the order is as desired, then go have a G & T 🙂

Backup and Clear Domain Controller Security Event Logs

A post related to https://blog.oholics.net/logparser-loves-security-logs/, for Case 3.

If you don’t manage security logs by regularly backing them up and clearing them, you risk losing important historical information. Additionally, running a LogParser query against a large, unmanaged security event log takes a long time.

The below script is designed to be run daily at the end of the day to backup the security event log on a Domain Controller and then clear its contents. Additionally, the logs are archived off to two windows shares to allow for long term storage.

The script makes use of Jaap Brasser’s DeleteOld script (https://gallery.technet.microsoft.com/scriptcenter/Delete-files-older-than-x-13b29c09) to carry out tidy up operations of the local staging folder. In practice, I used the same script to manage the archive folders too, keeping 365 days worth of logs.

Usage: .\BACKUP_AND_CLEAR_EVENTLOGS.ps1 <DomainController> $clear

Make sure that the security event log maximum size is increased to a high enough level to ensure that none of the days logs get overwritten. Judging that size will depend on the number of events per day or alternatively just set to “do not overwrite events”.

Note: the event ID’s are purely made up 😉

Enumerate Azure Role Assignments

The following script can be used to enumerate role assignments for a subscription and role assignments for Resource Groups within that subscription.

Use as-is to just grab everything – note 2 subscriptions are used in the example – fix the subscription GUID’s on lines 6 & 7.

Optionally un-comment the references to -SignInName “Jon@oholics.onmicrosoft.com” to obtain a report showing only those resources that refer to the named user.

The resulting report can be opened in Excel, to product a nice table 😉

PowerShell Module for AD/ ADLDS Schema modification

A couple of years ago a colleague within my company (Avanade) published a link to a GitHub project that he had just completed: https://github.com/SchneiderAndy/ADSchema

I had just finished working on a project using MIM to synchronise identities and groups from two domains into one Microsoft ADLDS instance, using the ProxyUser class to allow ADLDS to become a common authenticator for a divestment. While proving out the solution, the target ADLDS instance was trashed and rebuilt countless times. The rebuilds were time consuming and boring. With this use case in mind, I took a fork of Andy’s solution and spent a few months (off and on) to modify the module to allow its use against ADLDS, as the methods used to interact with ADLDS were often very different.

My version of the module can be found here: https://github.com/jkbryan/ADSchema, the detailed usage examples are detailed in the readme file.

If you want to give it a try, please, please test against something non-production! I will not be held responsible for any mistakes made while using the module. Test, test and test again before using it in a production environment!

New-PAMDomainConfiguration: There was no endpoint listening at http://localhost:5725/ResourceManagementService/MEX

Still suffering pain trying to get the MIM PAM lab setup on my underpowered Hyper-V System.

I was having a lot of issues with getting the New-PAMDomainConfiguration cmdlet to run successfully, so after lots of debugging; I gave up, trashed the current lab setup and started again, following the lab guide to the letter this time! Well, almost.. I only have two VM’s these are the DC’s for each domain, with everything crammed onto them.

A quick error and fix – as per the title:

New-PAMDomainConfiguration1

Issue was that the SQL service had not started, thus the Forefront Identity Manager Service had not started. Fix… start those pesky services and try again. I believe that the services are failing to start simply because of little resource (2 GB RAM only).

Now that was simple, but I’m still seeing the problems that I was seeing before; that being that when running the New-PAMDomainConfiguration after starting the services, I get the following unhelpful error:

New-PAMDomainConfiguration: The Netdom trust command returned the following error:

New-PAMDomainConfiguration2

Ah the “Blank Error” error – digging through the $error variable does not reveal anything useful. If I find a solution, I’ll be back….

I posted a question on the TechNet FIM forum:

https://social.technet.microsoft.com/Forums/en-US/be2433b4-daa6-493c-8922-684df506337d/newpamdomainconfiguration-the-netdom-trust-command-returned-the-following-error?forum=ilm2

The workaround provided by Jeff seems to have worked – well there were no errors executing the detdom commands. I have a few more bits to do to complete the lab and verify that all is working as expected.

Delegating Group Management – Using the Lithnet FIM PowerShell Module

Within my AD structure, group management is delegated within certain OU’s, I now need to replicate that functionality in the FIM portal.

The is no real way of identifying which groups should be managed by whom, except the OU within which the group currently resides.

So, to start off with I need to get the parent OU of the group into the portal:

Import the OU into the MV:

Setup an export flow for adOU into the portal.

Then, by using the Lithnet PowerShell Module, we can create all the sets and MPR’s required, below is a sample for creating one delegated “collection”. In production, my XML file is much bigger – delegating group management to around ten different groups.

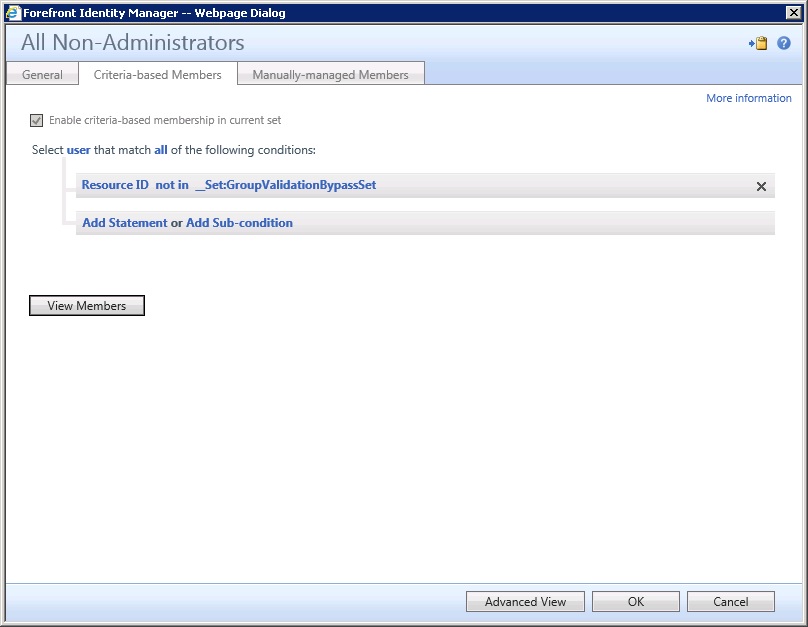
Note, that you first need to create references to all users who might be given the rights to manage groups. This includes the FimServiceAdmin and FimServiceAccount – referenced by their ObjectID, the others are referenced by their AccountName. All members referenced in this section, are added to the __Set:GroupValidationBypassSet. This set is defined in the non-administrators set – not in this set – this bypasses the group validation workflow:

AllNonAdministratorsSet

Create a set of groups to be managed – the filter being the OU that the groups belong to & MembershipLocked=False

Create a set of administrators for this delegation – adding the explicit members

Then create the two MPR’s to allow the members of the administrative set to manage those groups – the first MPR allows modification (Read, Add and Remove) of the ExplicitMember attribute, while the second allows creation and deletion.

Use Import-RMConfig -File <PathToXML> -Preview -Verbose to validate your xml and see what it would do. Drop the “-Preview” to make the change

Yubikey Neo

So this is not directly relevant to FIM per se, but it falls under the kind of IdM/ Authentication umbrella, so I thought it belonged here….

In December 2014, I bought a Yubikey Neo. I wanted to see how it could be used to harden access to some sensitive “stuff”.

These are really cool devices; they are relatively inexpensive (~£36), yet provide a bunch of functionality all on one device, some of which I have not used.

The components that I did use were:

  • Yubico OTP – the One Time Passcode functionality that is present OOB – used to sign into the Yubico Forums
  • U2F – I use this for 2FA for my Google accounts and this blog – it is very simple to set up this 2FA method across multiple services. Look here for more information: https://www.yubico.com/applications/fido/
  • SmartCard (PIV) – this was the part that I was really interested in for securing stuff within the enterprise. I had recently installed a Windows PKI Infrastructure, so used that to generate trusted SmartCard Logon Certificates to install onto the devices. Look here for configuration docs: https://developers.yubico.com/yubico-piv-tool/

As with most of these things the documentation was initially difficult to read, there were various command line tools to manage different aspects of the Yubikeys, some of them had bugs at the time.

Anyway, long story short, back then I got it configured just how I wanted and used it daily ever since. However, just before Christmas, the SmartCard certificate that I had generated the previous year expired. Thus, the SmartCard functionality of the Yubikey became invalid.

I generated myself a new certificate from my CA, then came to try to remove the old certificate from one of my Yubikeys. I could not because I needed to authenticate against the device to carry out this action. The authentication string (aka password) is called the Management Key, that is (should be) changed from the default value when configuring the device. I went on the scrounge trying to find the key for this particular device, I found my old notes (command line dumps) from the previous year, there were a few management Keys within but not one for this particular device.

So, I might as well reset it, back to the docs: https://developers.yubico.com/yubico-piv-tool/YubiKey_PIV_introduction.html, in order to be able to reset the device, I first need to lock the device, by providing bad PIN and PUK values:

OK, so now I need a new management key….. The docs use dd to generate the key:

At the time, I didn’t have easy access to a Unix system to do this, but more importantly I wanted to find a way to achieve the same result in Windows, using PowerShell. This would allow me to script the whole process. Here is the script to create the management key (For info about what “{0:X2}” means, look here: http://www.powershellmagazine.com/2012/10/12/pstip-converting-numbers-to-hex/)

I have now re-written a script that I put together last year to add initialise a new or reset Yubikey (with PIV support) and add a user SmartCard certificate from a Windows CA:

O365 License Management, Using AD Groups

Previously, I wrote the following post about license management: https://365.oholics.net/office-365-licence-management/. This post relied on text files to hold the UPN of users who should have specific licenses.

I now have a new script the does that same task but uses AD groups to hold the licence entitlements. I have placed a copy of the script below.

One thing of note (a bug), that will be present in the previous script, is that of assigning a licence that is in conflict with an already applied license. This issue arose while testing this new script, notably for users who were being entitled to a Project licence.

During processing, I was seeing errors like “Conflicting Service Plans: SHAREPOINTWAC_EDU, SHAREPOINTWAC_EDU” and “Conflicting Service Plans: SHAREPOINTSTANDARD_EDU, SHAREPOINTENTERPRISE_EDU”. Where this part was present in both of the license collections – the one already applied and the project license that was to be applied.

The solution is messy, but does work.

First the “base” user licence “STANDARDWOFFPACK_FACULTY” must be removed, and then replaced by the same license, but with more disabled components – in this case EXCHANGE_S_STANDARD, SHAREPOINTSTANDARD_EDU and SHAREPOINTWAC_EDU. Once that is complete and verified, then try to apply the complete Project license.

The complete script is here: