Consider the scenario: opening a ticket within Azure for an issue with an infrastructure component or security event. IP addresses, domain names and Machine names are classed as sensitive and should not be revealed to MS support staff.
You have a folder filled with event logs from the problem machine(s). You need to redact the above mentioned properties.
By using LogParser with the following sql statement, a CSV file is exported which strips out the sensitive properties, replacing parts of the properties with X’s.
‘OHOLICS‘ is replaced by ‘XXXXXXX‘ where it is found in an event log, in the Strings, ComputerName, Message or Data fields
The first two octets of an IP address are stripped, where these are ‘192.168.’ in the Strings, Message or Data fields
‘blog.oholics.net‘ is replaced by ‘blog.XXXXXXX.net‘ where it is found in an event log, in the Strings, ComputerName, Message or Data fields
Note that after the output file is created, the header row will need to be updated to remove the replace statements. Where normally just the item name would be added as a header, the full replace query is added as the header for those items.
Ha-ha! only one year (and a bit later) I finally finished the tidy up. All code samples are now in github gists. Crayon Syntax Highlighter is no more, it was a good plugin, but time for something better.
I found some odd formatting issues in some of the code samples. I reckon most of these are a legacy from when the blog was running on a Raspberry Pi and the cheap 4GB SD cards the the blog was running on were getting corrupted almost once a week. I used to spend hours every week recovering either the database or the entire disk image. Ahhh, such fond memories :), but a great way to learn.
It has been a super busy year, learning some new stuff focused on Azure infrastructure, Azure RBAC and AAD authentication to legacy applications. I’ll publish some content related to these activities soon.
I have noticed a few formatting issues with the Crayon syntax highlighter plugin on some posts, so have migrated those that were ‘broken’ to GitHub Gists. I’ll eventually migrate all of the code samples/ snippets to Gists, as they should display more consistently and remove the need for rendering each sample by WordPress.
The last year or so has been interesting, moving from “normal” work to consulting, a great change! With the drawback of having less time to commit to getting stuff on here as well as greater concerns over intellectual property rights and confidentiality.
Initially, it looked like the low traffic sites were those that were affected (they had the newest certificates), so I kind of took the lazy approach of just leaving them as is. I figured that that start.com would get their new CA in place and trusted reasonably quickly, not so! I recently noticed that Mozilla/ Chrome had started distrusting even those certificates that were generated prior to October 2016. So now all of the blogs were generating security errors, this was not ideal. I looked at moving to Let’s Encrypt, but it would not have been a simple migration – more than a five minute job. Then, a few weeks ago, I noted that start.com had their new CA in place. Great! but when I asked their support people about global trust, the answer was “not yet”, with no idea of when that would be in place.
I was still running the hosting platform from home, which was less than ideal, given the lack of a fixed IP and intermittent issues with Dynamic DNS not updating, plus the running costs/ fire risk etc….
So, I recently made the decision to migrate the platform to a cloud provider and to get the certificates issues resolved properly, moving finally to Let’s Encrypt. On a fresh server, it was remarkably easy to setup, just requiring a little DNS Flip-Flopping to get things in order.
Now it is all in place/ tidy, I have a bunch of stuff to add to the blog. However, FIM is going EOL, so the name of this blog is going to become defunct too! Managing and maintaining the other blogs as separate entities is a bit of a PITA too. Therefore, I plan to (eventually) migrate content from all 4 blogs into one new core blog site – name TBD. I may add some stuff here in the meantime, just to get it out of my brain and onto paper, so to speak… else I may wait until I have done the migration component – depends on how long it might take..
Until then, I hope the previous content still provides a good repository for FIM “stuff” for others as well as myself 🙂
I’m installing onto Server 2012 R2, with SharePoint Foundation 2013 SP1
After installing the SharePoint Foundation 2013 Prerequisites, using the Service Pack 1 release, all installs just fine. Then I run the setup.exe, very quickly I’m prompted with the message “Setup is Unable to Proceed due to following error, requires .Net Framework 4.5“. The prerequisite installation log (C:\Users\<MyUserAccount>\AppData\Local\Temp\) shows:
2016-01-29 22:39:36 – Check whether the following prerequisite is installed: 2016-01-29 22:39:36 – Microsoft .NET Framework 4.5 2016-01-29 22:39:36 – Reading the following DWORD value/name… 2016-01-29 22:39:36 – Install 2016-01-29 22:39:36 – from the following registry location… 2016-01-29 22:39:36 – SOFTWARE\Microsoft\Net Framework Setup\NDP\V4\full 2016-01-29 22:39:36 – The value is (1) 2016-01-29 22:39:36 – Reading the following string value/name… 2016-01-29 22:39:36 – Version 2016-01-29 22:39:36 – from the following registry location… 2016-01-29 22:39:36 – SOFTWARE\Microsoft\Net Framework Setup\NDP\V4\full 2016-01-29 22:39:36 – The value is… 2016-01-29 22:39:36 – 4.6.01055 2016-01-29 22:39:36 – A post release .NET 4.5 is installed
However, the SharePoint Foundation installation log shows:
2016/01/30 19:27:00:389::[3788] Catalyst .Net version check failed. Setup requires .Net Framework version 4.5.50501 to install this product
4.6.01055 is installed but the installer wants the older version – 4.5.50501.
So, after a bit of googling, I find this: https://social.technet.microsoft.com/Forums/sharepoint/en-US/bbed58e1-4a80-4dde-91fd-c6fc95bf85ac/sharepoint-2013-installation-with-net-framework-4550501-and-4550709?forum=sharepointadmin
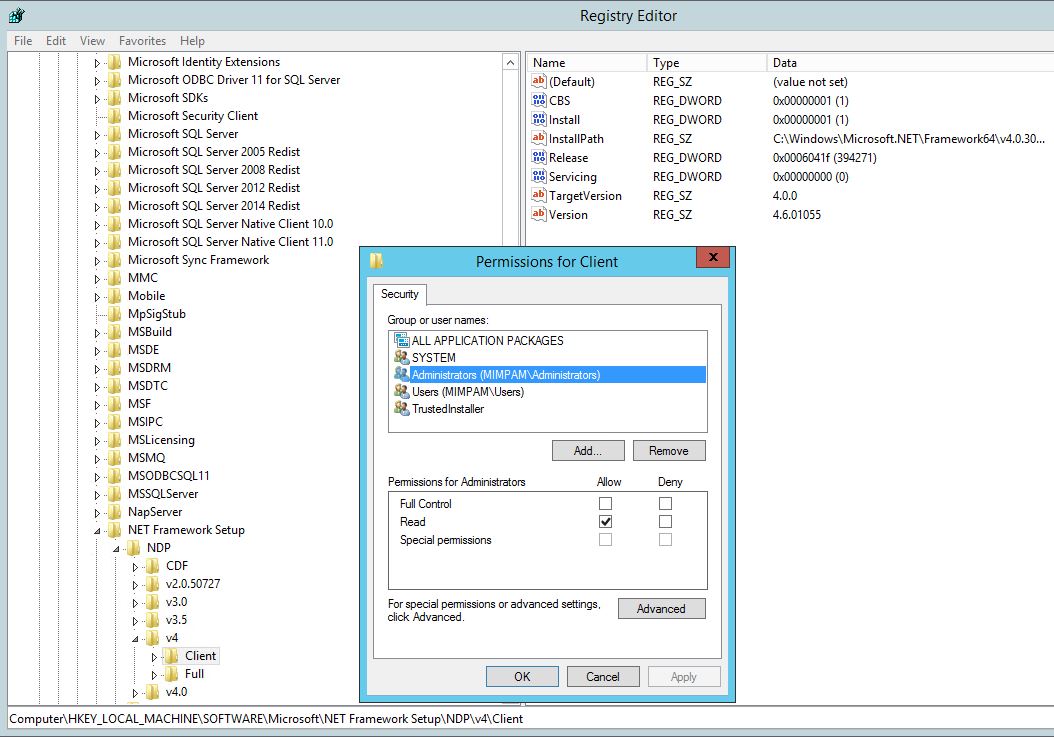
In that post, Rick just sets all of the registry entries. However, the one that seems to be the ‘looked up’ value (at least based on my testing today), which is contrary to the prerequisite log, is HKEY_LOCAL_MACHINE\SOFTWARE\Microsoft\NET Framework Setup\NDP\v4\Client.
Detailed method:
Right click the Client key, choose Permissions…
Note that the Administrators group has Read access by default.
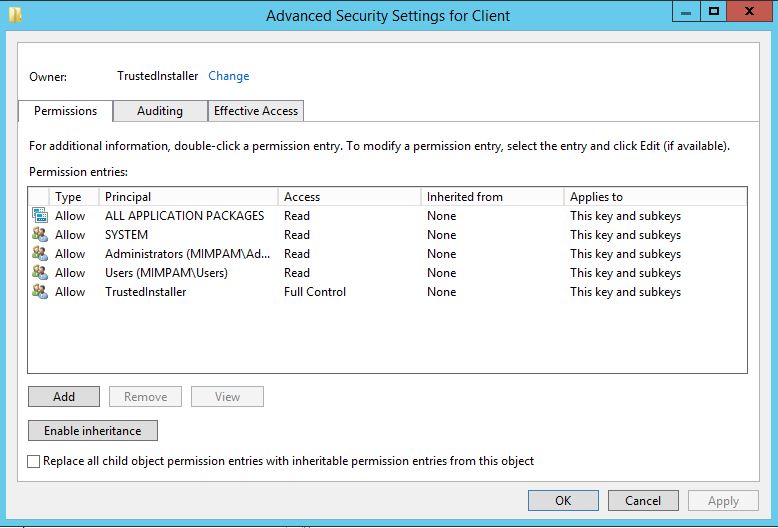
Click Advanced, note at the top of the window, the owner is shown as TrustedInstaller:
Click the Change link beside the owner label.
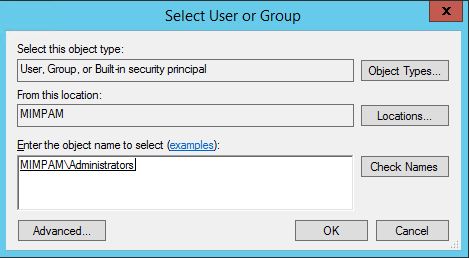
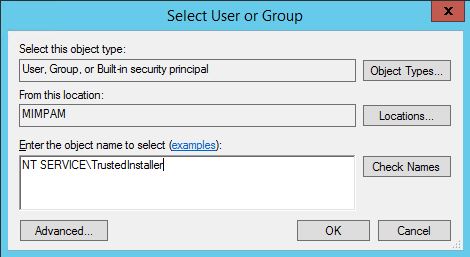
Change the scope (“From this location”), to the local machine, choose <localmachine>\administrators group:
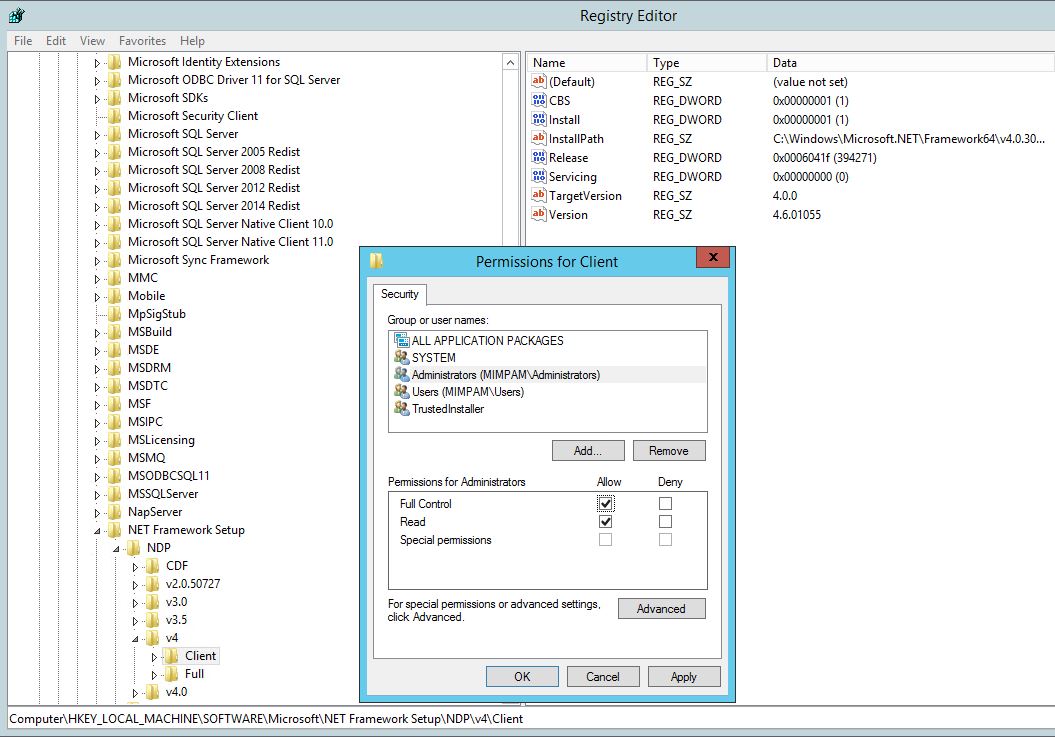
Click OK, then OK again until we are back at the initial Permissions window, tick Full Control for the Administrators group:
OK, then go set the Version number to 4.5.50501
Install SharePoint Foundation 2013.
Once complete, put things back to how they were before – of course this is optional….. just depends on how lazy you feel and whether you want to be caught out by the fact that you changed this sometime in the future, then can’t figure out why something else doesn’t work. Making the change back is so straightforward and quick, I believe that it is worth doing 🙂
After installation, flip version back to 4.6.01055. Then, right click the Client key, remove full control from the Administrators group, apply. Then, click Advanced, go and change the Owner again – as before but using NT SERVICE\TrustedInstaller as the owner:
So this is not directly relevant to FIM per se, but it falls under the kind of IdM/ Authentication umbrella, so I thought it belonged here….
In December 2014, I bought a Yubikey Neo. I wanted to see how it could be used to harden access to some sensitive “stuff”.
These are really cool devices; they are relatively inexpensive (~£36), yet provide a bunch of functionality all on one device, some of which I have not used.
The components that I did use were:
Yubico OTP – the One Time Passcode functionality that is present OOB – used to sign into the Yubico Forums
U2F – I use this for 2FA for my Google accounts and this blog – it is very simple to set up this 2FA method across multiple services. Look here for more information: https://www.yubico.com/applications/fido/
SmartCard (PIV) – this was the part that I was really interested in for securing stuff within the enterprise. I had recently installed a Windows PKI Infrastructure, so used that to generate trusted SmartCard Logon Certificates to install onto the devices. Look here for configuration docs: https://developers.yubico.com/yubico-piv-tool/
As with most of these things the documentation was initially difficult to read, there were various command line tools to manage different aspects of the Yubikeys, some of them had bugs at the time.
Anyway, long story short, back then I got it configured just how I wanted and used it daily ever since. However, just before Christmas, the SmartCard certificate that I had generated the previous year expired. Thus, the SmartCard functionality of the Yubikey became invalid.
I generated myself a new certificate from my CA, then came to try to remove the old certificate from one of my Yubikeys. I could not because I needed to authenticate against the device to carry out this action. The authentication string (aka password) is called the Management Key, that is (should be) changed from the default value when configuring the device. I went on the scrounge trying to find the key for this particular device, I found my old notes (command line dumps) from the previous year, there were a few management Keys within but not one for this particular device.
OK, so now I need a new management key….. The docs use dd to generate the key:
At the time, I didn’t have easy access to a Unix system to do this, but more importantly I wanted to find a way to achieve the same result in Windows, using PowerShell. This would allow me to script the whole process. Here is the script to create the management key (For info about what “{0:X2}” means, look here: http://www.powershellmagazine.com/2012/10/12/pstip-converting-numbers-to-hex/)
I have now re-written a script that I put together last year to add initialise a new or reset Yubikey (with PIV support) and add a user SmartCard certificate from a Windows CA: