Within my AD structure, group management is delegated within certain OU’s, I now need to replicate that functionality in the FIM portal.
The is no real way of identifying which groups should be managed by whom, except the OU within which the group currently resides.
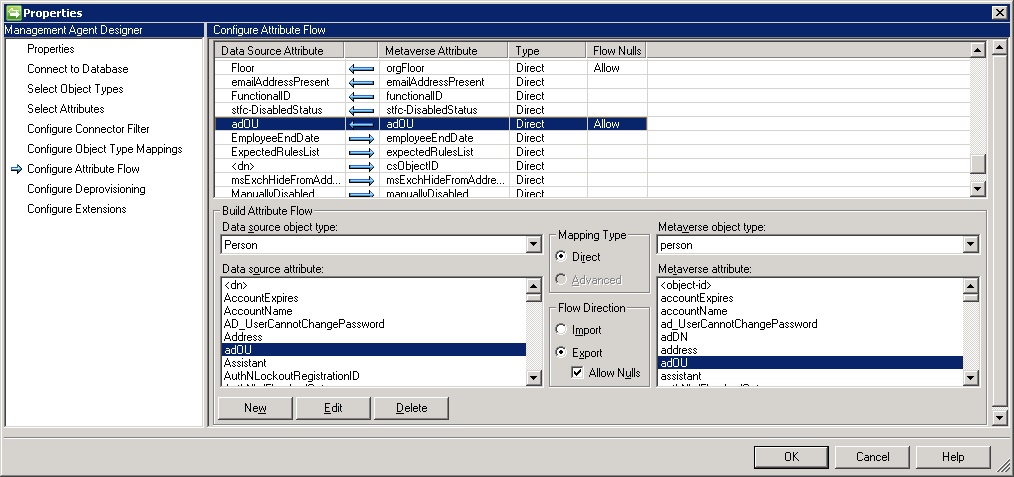
So, to start off with I need to get the parent OU of the group into the portal:
Import the OU into the MV:
Setup an export flow for adOU into the portal.
Then, by using the Lithnet PowerShell Module, we can create all the sets and MPR’s required, below is a sample for creating one delegated “collection”. In production, my XML file is much bigger – delegating group management to around ten different groups.
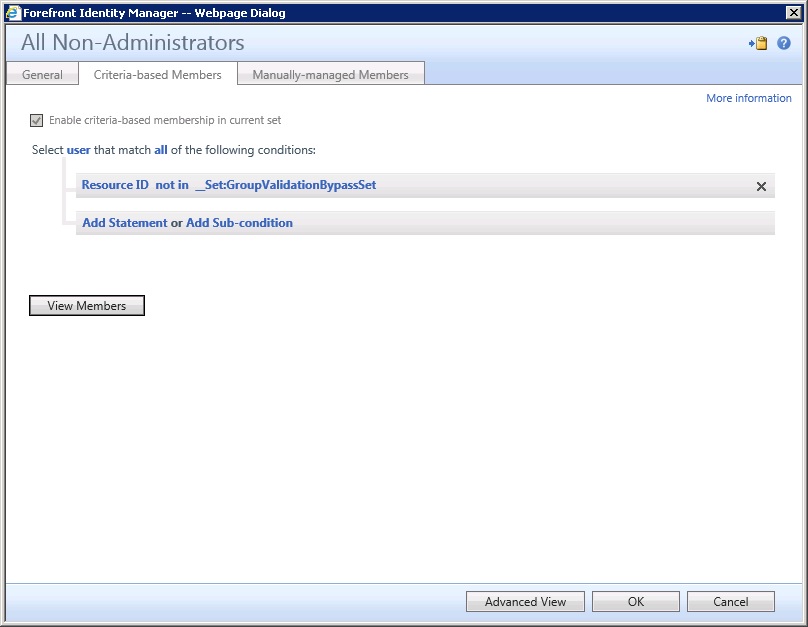
Note, that you first need to create references to all users who might be given the rights to manage groups. This includes the FimServiceAdmin and FimServiceAccount – referenced by their ObjectID, the others are referenced by their AccountName. All members referenced in this section, are added to the __Set:GroupValidationBypassSet. This set is defined in the non-administrators set – not in this set – this bypasses the group validation workflow:
Create a set of groups to be managed – the filter being the OU that the groups belong to & MembershipLocked=False
Create a set of administrators for this delegation – adding the explicit members
Then create the two MPR’s to allow the members of the administrative set to manage those groups – the first MPR allows modification (Read, Add and Remove) of the ExplicitMember attribute, while the second allows creation and deletion.
Use Import-RMConfig -File <PathToXML> -Preview -Verbose to validate your xml and see what it would do. Drop the “-Preview” to make the change
A long term goal of mine, has been to get “account requestors” to take ownership of their Service Accounts.
Attempts have been made by my predecessors to record an owner of a service account, but it has simply been done as a string attribute of the AD object. Thus, when the person leaves and the account is deleted, the service account becomes orphaned, with an reference to a long forgotten ID.
So thinking of a way to carry this out….. I am already using the email address of the owner of an administrative account to make decisions about whether the administrative account should be enabled or disabled – based on the end date of the owner – discovered by looking up the email address in the MV.
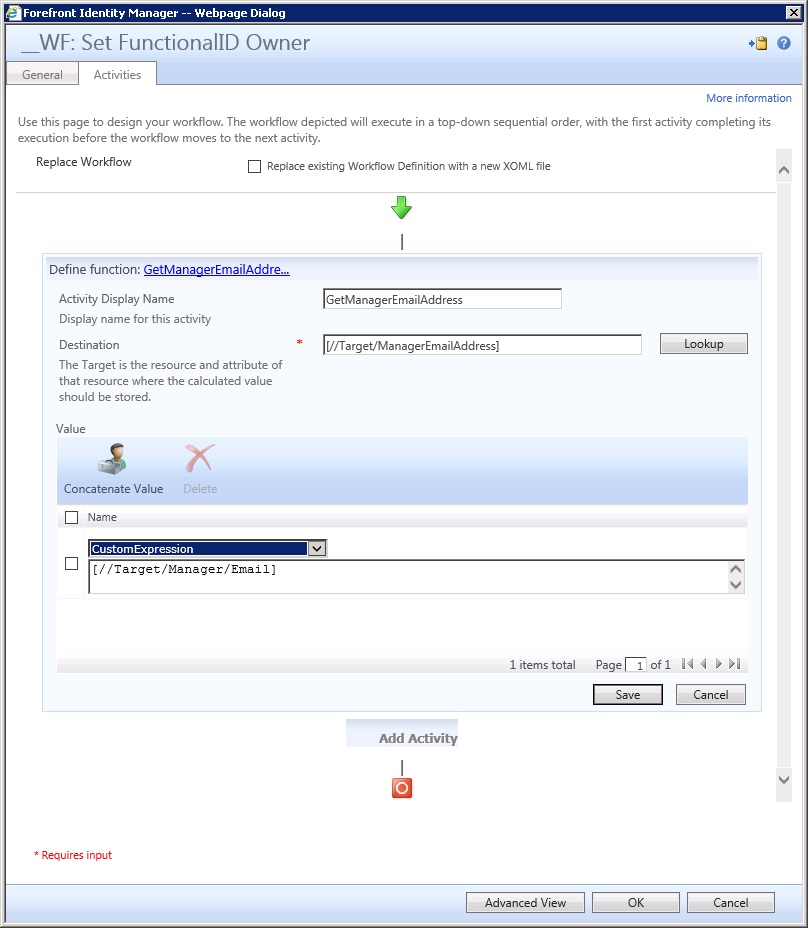
I figured that I could do something similar for those Service Accounts. I’ll be creating service accounts via the portal, the owner of the account will be assigned to the manager attribute. So, how can I get the email address of the manager into the MV as a thing that I can lookup??? I can’t do an advanced flow rule on the FIMMA, and even if I could, Manager is a reference attribute, so I can’t do it anyway… I found an article about dereferencing another attribute, that get me going down this path….. The solution is simple. Create a new attribute and binding in the portal – “ManagerEmailAddress”, then setup a workflow as follows:
When the account falls into scope, the managers email address is set into that new attribute – in the sync engine create a direct flow to put that into the MV (I’m using “serialNumber” – for one reason or another, that I wont go into :)).
I have on the import from AD, some code to set an MV boolean flag – “functionalID” – if the DN of the person object contains the strings found in the Service Account OU’s, thenfunctionalID = True. This attribute is pushed into the portal and is used in set definitions.
So, I’m getting there. Now I need something to set another flag in the MV that will go to the portal. this one defines if the owner of the Service Account is approaching their end date (30 days prior):It is defined on the Import from AD and populates the MV attribute “functionalID-owner-expiring”
Of course after initial code definition, I found another of those inevitable exceptions, so added the generateArrayFromFile function, with a reference (in txt file) to the email address that should be ignored.
Create attribute and binding in the portal for FunctionalID-owner-expiring
Setup an Export in the FIMMA for the new attribute
Create a set: FunctionalID = True and FunctionalID-owner-expiring = True.
Create notification workflow and mail template: notification to [//Target/Manager], then the set transition MPR.
I think I have it, just need to do a little testing to see that it works as expected.
I’m still a long way from the stated goal, as I still need to find “owners” for all of those accounts that have been created in the past.
Recently, one of my co-workers was assigned to work with me to learn some FIM and to help, where possible, with some configuration.
One of the things on my list of “things to do” was to find a way of hiding certain portal buttons from a normal users view – after all they are not (currently) going to be allowed to use the portal for any self service task yet – that might come later….
So, I sent my co-worker off to find and implement the solution in the test environment, thinking “It can’t be that hard…”
This was done around 1 month ago and already I’m forgetting the actions that were carried out, so I’m going to document the steps in a more verbose fashion here for future reference.
Create new search scopes, using the original Search Scopes’ values as the basis. The resource type shold be “Resource”.
I had already setup a new Usage Keyword “PrivilegedUsers”, that I was using to control the things that the helpdesk users would see to do their admin tasks. So, in the original search scopes this keyword needs to be added and the BasicUI and GlobalSearchResult keywords should be removed. Then in the (new) copies of the search scopes, BasicUI and GlobalSearchResultshould be present.
Original and New Search Scope Usage Keywords:
Do an IIS reset….
Now on the home page, choose one of those new search scopes and do a “blank” search. Copy the URL that this search went to – note that the UI of this search presents only the details button.
Do the same thing for each of the new search scopes, copying the URL’s for later….
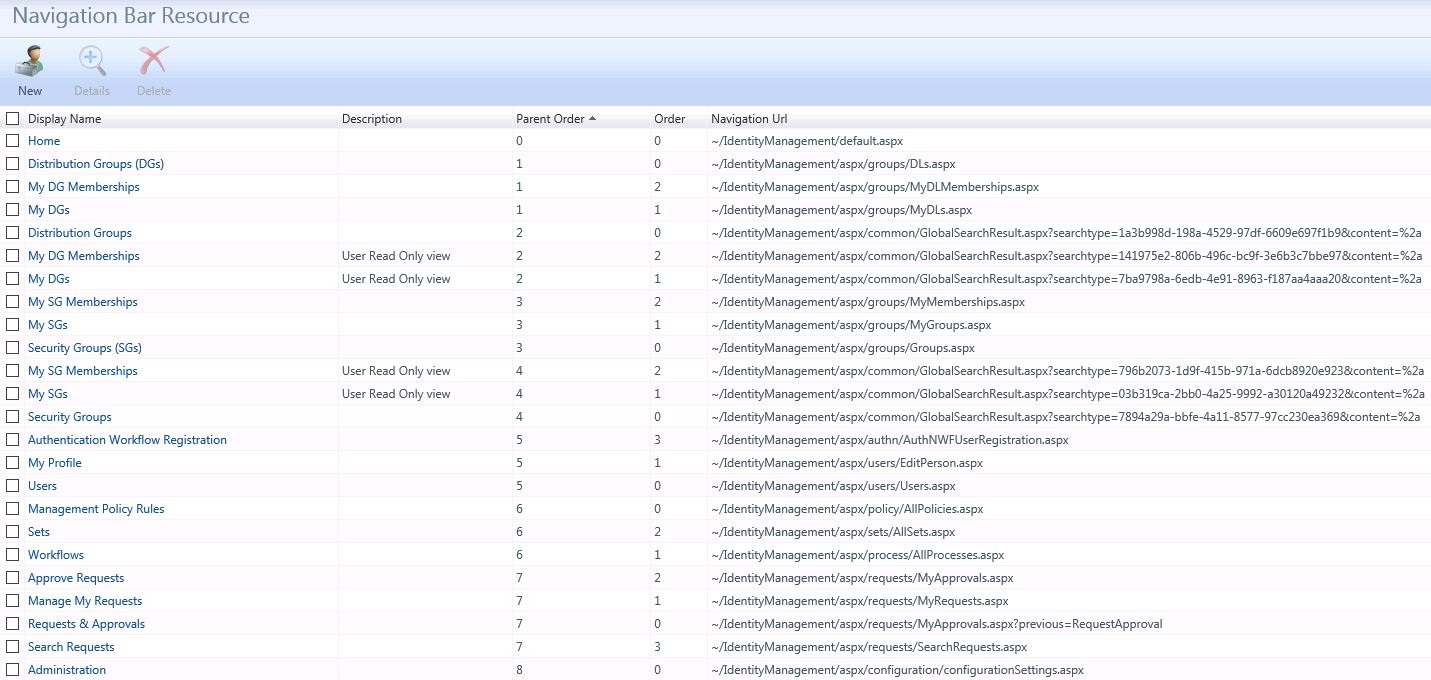
Now we need to make those URL’s available via the portal UI. We need to do this for both the Navigation Bar and Home Page, so create new resources, using the information within the originals as the basis. The only change that I made was to remove the reference to (DGs) and (SGs) for the top level items and to add a description “User Read Only view” for those new items with the same name (so that I could tell the difference):
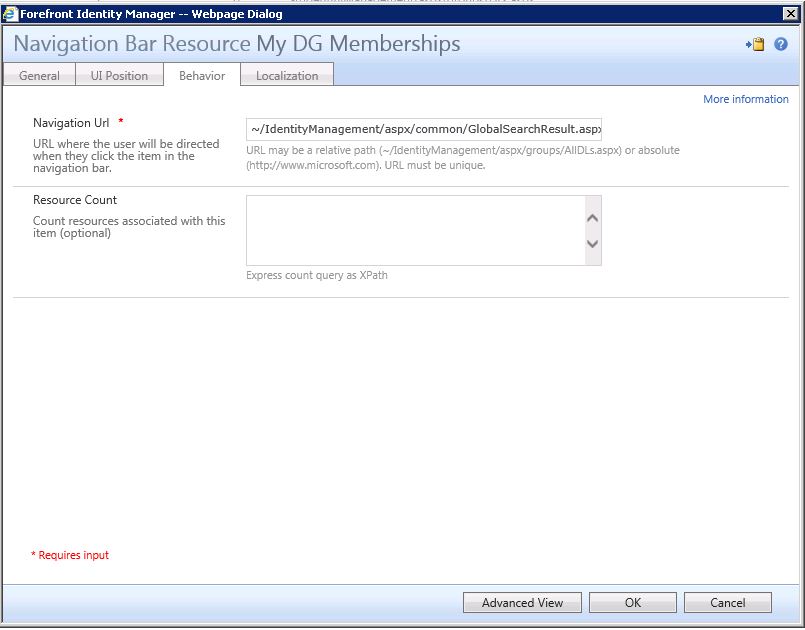
Use the URL’s that were obtained from the search scopes to define the behaviour of the Resource:
Do an IIS reset….
If you copied the Parent Order and Order values of the original Resources, the result is a little messy from the Administrators POV, as all of those items are crammed together. Unfortunately, I know of no way to hide an item from the admin, so I just rearranged the order of the layout. It displays as follows after re-arranging both the Nav Bar and Home Page Resource orders:
A normal user looking at the portal sees this, the links go to the URL’s in those Search Scopes defined earlier:
And when looking at for example “Distribution Groups”, sees that Details button only:
The PrivilegedUsers view, looks like this:
And if a member of PrivilegedUsers uses the Distribution Groups (DGs) link, they see this – note all of the buttons are available:
If I remember missing something or something not being quite right, I’ll be back to correct…
A few days ago, I made a mistake while messing with my test set. I was getting bored of making myself drop in and out of a set (using the GUI) by changing my AccountName between my real account name and my AccountName plus another character. I was doing this to test my PowerShell workflow.
I was looking to use the Lithnet PowerShell cmdlet to add and remove me as a manual member. While trying to make this work, I removed my AccountName from the criteria based membership – thus the mistake was made!
I saw rather a lot of PowerShell workflows kicking off. Initially, I didn’t understand what was happening, until I looked at the requests and saw that each request was for a different person. By removing my AccountName from the criteria based membership, I had opened up the membership of my Test Set to “All Users”, thus all users fell into the set and kicked off a PS workflow. Bugger!
I found this: http://www.integrationtrench.com/2013/09/use-powershell-to-cancel-bunch-of-fim.html, which I’ll leave here for future reference. But in the end decided to just let the workflows progress, it was late in the day anyway, they would be done by the morning. A quick test of the commands in the referenced post indicated that it was going to take an age to get all of those requests the were in a Post Processing state.
Of course by the time it had got them all, many may have been processed by then anyway..
Lesson learnt: change the scope of a set carefully!
Now that my notifications are ready to go and there are a few real recipients (testers), I was considering what would happen when the FIMMA jobs were run – lots of emails!
The FIMMA had not been run properly for a few days – this is still a system in building – so there were a lot of attribute changes to export. Also, I’d had to put an MA back in temporarily, to fix up some bad end dates – I needed to fix precedence so that this was now lower – thus quite a few end dates had changed in the intervening period. That MA will be removed again shortly…
So, I needed to quickly disable all of the MPR’s that would trigger sending the emails. Again the Lithnet RMA was a great and quick solution!
Comment out/ uncomment out the true/ false lines as appropriate. I’ll need to re-enable all of these again once the FIMMA has run through.
Looking at what to do after creating all of the PowerShell WorkFlow scripts and respective html files, I started looking at what I’d need to change in my Lithnet XML configuration file.
Wouldn’t it be nice, if I could use that to update the configuration? What do I need to change? The MPR’s can remain, the sets are still valid, so only two changes per process/ collection – remove the email template, as it is now superfluous, and update the workflow definition.
What does a PowerShell XOML look like? I have no idea!
But using the Lithnet RMA, I can get it from my development workflow:
Great, so now I only need to comment out (or delete) the “Out” email templates and modify the existing XOML files for the “Out” operations to reflect the PowerShell workflow – pointing at the correct script – easy. Then run the Import-RMConfig cmdlet again to import those changes. I’ll just delete those few mail templates manually.
After all of the previous work, defining the pieces to get the mail notifications working, I noted that I was still getting mails that had blanks for the users details – where the attributes were being referenced like [//Target/AccountName] in the email template.
I understood the “why” – the accounts had been deleted – thus they were a transition out, but the object going through the workflow no longer had any attributes! Now to find a solution….
I thought that a custom workflow would be the most elegant solution and would give me a good opportunity to learn, although it might have been a little overkill to solve the issue, it would be a simple workflow. Oh, how wrong I was 🙂
So, after a fair few failed attempts, with mysterious compilation errors, I think I finally have it; a workflow that takes the current request and looks for the AccountName attribute – it even builds successfully (wow)!. So lets see if just that little bit works – in debugging mode….. Oh, so I also need an AIC to be created – looking at the documentation – I try this and that, getting nowhere and frustrated…
By now I have really had enough – its not really like me to give up, but for now I’m through with this black magic! I’ll come back later to dig into this again, just not now… I need a workaround to the issue for now and I know that the PowerShell Workflow will answer it – everything is possible with PowerShell!
Over the weekend I have been mulling over what I need to do using the PowerShell Workflow (http://fimpowershellwf.codeplex.com/). Looking at the Logging example script, I see that this should be easy. So, I start playing… OK, so I have my target requestor – how do I get the attribute values from it? The documentation is very good in terms of getting going, but does not offer much in the way of examples – e.g. getting the data from the PSObject. Using Get-Member, I can see that all of the attributes that I want are present, but when I refer to them in the script, by $Target.AccountName, it appears that the returned value is $NULL when run in the PS workflow. However, I can see that this is not the case in a standalone PS window.
Eventually, I find a way of getting the data out – e.g.: $Target.Get($_).AccountName, I’m pondering over why I need to jump through the hoops to get the data, but am happy that I got there in the end. I published my initial “solution” to my original question on TechNet and Brian comes back suggesting that I don’t need to use this convoluted way of getting the data – $Target.AccountName should just work!
After a few exchanges, it seems that by not including the -OnlyBaseResources switch on the Export-FimConfig cmdlet, I am getting referentially linked objects as well as the object that I have requested. By adding this switch, I can now get the data cleanly via $Target.AccountName.
To make use of this process, I now have to modify transition out process. Delete the transition out Email Template then change the workflow, so that is uses the PowerShell workflow – with the path to each PS script for each type of OU move. The html files used previously for the move operation also need to be modified to allow them to make use of the data/attributes being assigned to variables in the script.
So, here is the script that I put together, I need a copy for each move type, plus an amended html file for each move – no big deal, just some simple search replace.
Script to send email notification only if the AccountName exists:
OK, so although all the XML definitions worked fine and the objects were created, the differentiator between a New User and an Existing User moving into a Department was a little poor.
The new user email notification was configured to use an attribute that would make it clear to the reader of the mail if it was a new or existing person. However, by the time this attribute had reached the portal (for a new user), the mail had already been sent with a blank attribute referenced…. Not good!
So a little re-think…. I need another set of Sets to handle new versus existing people for each of those groups of people who want to know!
The existing Set: OU=Blah, wasused for both new and existing people where a Transition In is a New User or a user moving into that department. This one will now be used only for New Accounts only. A Transition Out was a person leaving that Department
A new Set was defined: OU=Blah AND where Portal CreationDate date is prior to Today – this will handle Existing users moving into or out of a department. Urgh, but that means that I need move in and out MPR’s, WF’s and templates, plus HTML and XOML. I am not provided Employee Start date from HR, so cannot use that.
Using the PowerShell Module, this is a little easier, but what started as just a re-hack of my original XML file turned into a slight re-design (tidy up, fixing some capitalisation (to allow for easier search/ replace) and better layout for readability) of the XML,
The existing Move MPR, WF and Template are re-purposed to become the ‘Active’ User move in (New User), then another series are created for Existing User move in and out (Movers). I also added another recipient for the initial period of testing the notifications – the real recipients will be added once I see that all is working as expected…
“—” is used as the search criteria and replaced with the relevant Department acronym – for me this joins everything up! Note that each template, once fixed, should be within the Lithnet wrapper:
The template job list is as follows:
And with slight modified XOML to match the XML, those being the references to recipients. which now has two references and the Email Template reference has its reference made to match the ID for that template in the XML, e.g.(showing “—” where the Department acronym should be) :
One of the things that I had to bear in mind for my FIM implementation was that the current legacy code provides email notifications of changes made. Due to the nature/ structure of the organisation, the different groups only want to know about changes to their own users.
So, when initially thinking about what people are currently informed about, and then the number of MPR’s, Workflows, Sets and Mail templates required to duplicate that functionality – I thought “no way!” It would be unmanageable. In the end and after discussion with the recipients of those mails, I got to a manageable number of things that those people really wanted to know about. These are:
A new user starting (a real new person), or a person who has moved horizontally within the organisation – they have moved INTO that department.
A user in their department becoming disabled
A user in their department becoming deleted
A user moving OUT of their department
So, I’m down to 4 things, but I have 9 different groups to inform.- So I have 36 Templates, 36 Workflows, 27 Sets and 36 MPR’s to define…..Even if I had a minion, I wouldn’t make them do that manually….
So, during Ryan’s presentation to the FIM User Group, I noted that he had introduced the ability to import these object by providing an XML file that defined them.
If all looks OK, run the command again without the Preview & Verbose switches.
My initial runs ran into errors due to the way that the employeeEndDate plus 180 days filter was being passed to the FIM service. Ryan has rapidly fixed and produced new versions to resolve these problems.
The great thing about this method, is that by using xmlref pointers, everything just joins up, resulting in a consistent set of objects that reference each other.
Note that the line:
Is used to provide a reference to the mail recipient, more recipients could be added, using the same structure, but a different id. Other pre-existing object references could also be added as appropriate.
So to summarise what is defined in the XML file:
4 Email templates – Add, Disable, Delete & Move – each with a corresponding and each slightly different html file
4 Workflows – Add, Disable, Delete & Move – each with a corresponding and each slightly different XOML file
3 Sets – User in OU=Blah, User in OU=Blah AND whose Status=Disabled, User in OU=Blah whose end date has passed, plus 180 days
4 MPR’s – Add, Disable, Delete & Move – all are transition in, except for the Move MPR, which is a transition out.
A few weeks ago, I created a new attribute in the portal called adOU. This attribute contained the Active Directory OU of a user and was defined in code from the HR database input – that’s where the OU definitions are defined…..
I planned to use the attribute to define Sets containing the users whose accounts resided in those OU’s. So, after creating and populating that attribute, I started looking at the Set’s Workflows, MPR’s and Email templates that I’d require to make use of that new attribute – these items were to be used to send email notifications.
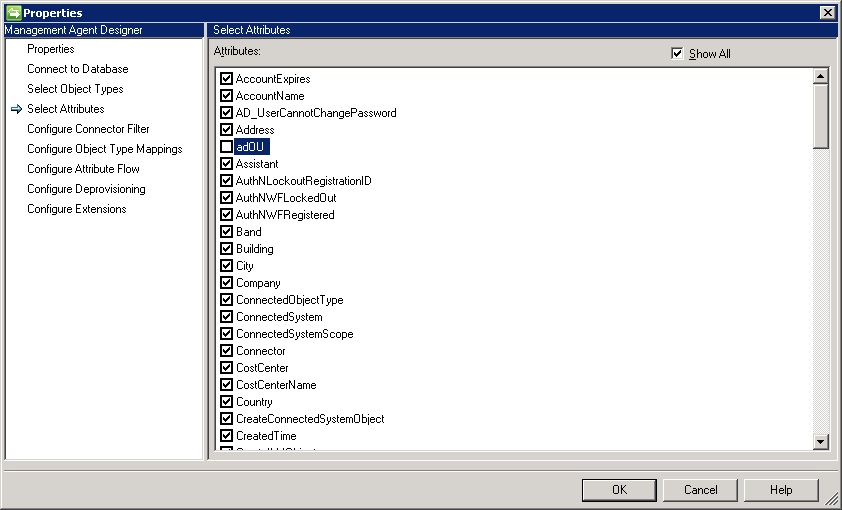
When I got to the point of creating the Sets, I noted that I could not choose the adOU attribute as a criteria. I checked the relevant MPR’s, Admin filter etc., all looked OK. Then I realised that when I created the new attribute, I had configured it as an un-indexed string. Thus, this was the reason that I could not use it in my Set definition.
So, off I go trying to delete the binding and attribute, always fails – after doing the few normal bits that I remember that I need to do beforehand – I have been here a few times before!
So, its about time that I documented all of the steps, to save me and maybe others the pain in the future.
Delete the attribute mapping in the FIMMA:
2. Un-tick the attribute in the attribute chooser in the FIMMA
.
3. Remove any references to the attribute in any workflows, MPR’s, Sets, mail templates etc..Run an Export policy script like the following, then look for references (e.g. “[//Target/adOU]”) to the attribute in the resulting xml file:
4. Clear the attribute from all users. Previously, I have used an MPR and workflow to to this, but in this case, I found it unreliable. So turned to the LithnetRMA PowerShell module (https://lithnetrma.codeplex.com/):
5. Finally, delete the binding and then the attribute – they should go now – if not something has been missed.
6. Refresh the FIMMA schema
Now in my case, I then re-created the attribute – as an Indexed String, and then the Binding. Then refreshed the FIMMA Schema again, added the attribute to the FIMMA picker, recreated the FIMMA flow, reset the MPR’s (to allow the attribute to be managed) and Admin filter permissions. Then run the export to get the data back into the portal. The Set criteria now contains the option to use adOU.