About Jon Bryan

Posts by Jon Bryan:

Azure Service Principle Authentication

I have recently been working within a client where all Azure/ Office 365 users must perform MFA on logon.

Ages ago I posted about using credential manager to automate Office 365 scripts: https://blog.oholics.net/using-credential-manager-to-authenticate-office-365-scripts/. This method will clearly not suffice where MFA is enforced, as there is no mechanism to allow MFA challenge and response.

Recently I have been looking into using Azure Service Principle objects to bypass MFA and to allow scripts, that need to connect to Azure or other services, to do so without input. Thus, I can then schedule scripted tasks to generate reports on Azure AD objects or AzureRM items.

Firstly I need to create some certificates, these will be used to authenticate, see here: https://blog.oholics.net/creating-simple-ssl-certificates-for-server-authentication-using-openssl/ for details on certificate creation.

Next, once we have the PFX certificate file, we can create the Azure App Registration, using PowerShell:

Then (optionally), if the script that you want to automate will be reading AzureRM objects, run the following script. Note that if the role assignment is to be constrained to a specific resource group, add the  -ResourceGroupName switch to New-AzureRMRoleAssignment

Additionally, the RoleDefinitionName can be altered to suit.

Now we have the Service Principle in place, we can connect! But in the case of the Azure AD connection, I need to first allow the application to Read AAD:

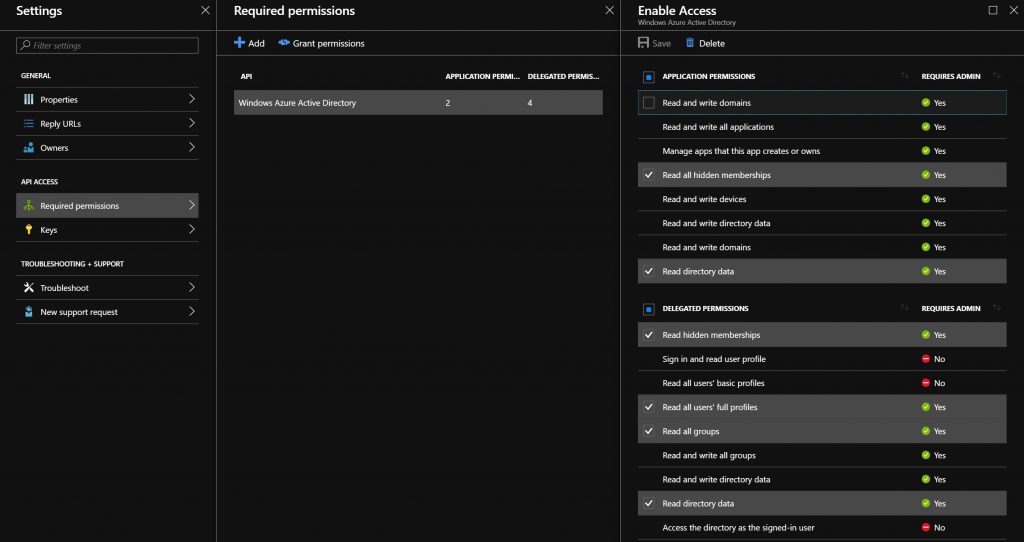
Go to the App Registrations blade in Azure AD, pick the application created earlier, then select settings. Select Required Permissions, add Azure AD and add the permissions shown in the following image:

Now lets connect using the certificate thumbprint:

By installing the certificate in the CurrentUser store, only that user can consume the certificate thumbprint for authentication using this method. Lovely.. 🙂

Why is this method secure?

  • You can only access the application to sign in if you have installed the certificate on the machine that you want to run the script from.
  • To install the certificate, you must know the password that was set on the private key during PFX creation.
  • No AAD user object is created
  • No plain text passwords need to be stored

To sign in using this method, you must know:

  1. The AAD Tenant GUID
  2. The Application GUID of the configured application
  3. The specific thumbprint of the certificate, used to make the connection
  4. The certificate and private key must be installed on the machine on which the connection attempt is being made.

Can’t rename, move or delete an OU

Today, I came across something that had me quite stumped…. well for a few minutes anyway 🙂

I was doing some tidying up of a domain, I found an OU that was incorrectly named, it was not to design. I thought, I’ll just rename it, but found that the option to do so was not available.

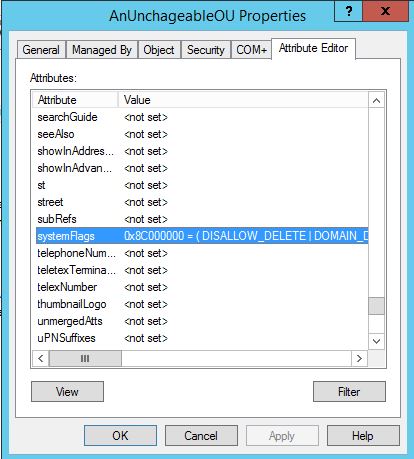
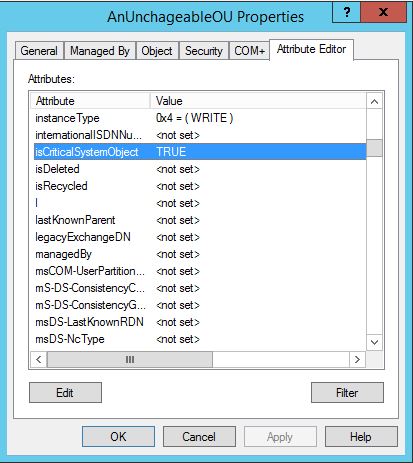
I took a look at the attributes of the OU, two immediately struck me as odd:

systemFlags was set to DISALLOW_DELETE|DOMAIN_DISALLOW_RENAME|DOMAIN_DISALLOW_MOVE


isCriticalSystemObject was set to TRUE:


Neither of these attributes could be modified, an error was thrown if attempted.

The simple answer: This OU had been set as the default location for new computer objects via redircmp 

By running redircmp CN=Computers,DC=oholics,DC=net (or your other true destination):

  • The systemFlags attribute was banished
  • The isCriticalSystemObject attribute was set to FALSE
  • The OU could be renamed, moved and deleted 😉

Creating simple SSL certificates for server authentication using OpenSSL

It is often useful to have a standalone and reliable process for provisioning SSL certificates, using an existing CA (internal or public) for use on enterprise servers.

This process makes use of OpenSSL, the Windows binaries for which can be found here: https://slproweb.com/products/Win32OpenSSL.html

Once installed, use an administrative command prompt and navigate to C:\OpenSSL-Win64\bin.

Use the following OpenSSL configuration file (backup the original first) in the bin directory:

Edit line 232 to define the first SAN for the certificate, this should match the common name of your certificate. Add further SAN’s in the subsequent lines.

For example, if my server advertised DNS name is blog.oholics.net, but I also want the root domain to be added as a SAN, then DNS.1 = blog.oholics.net and DNS.2 = oholics.net.

Run the following commands.

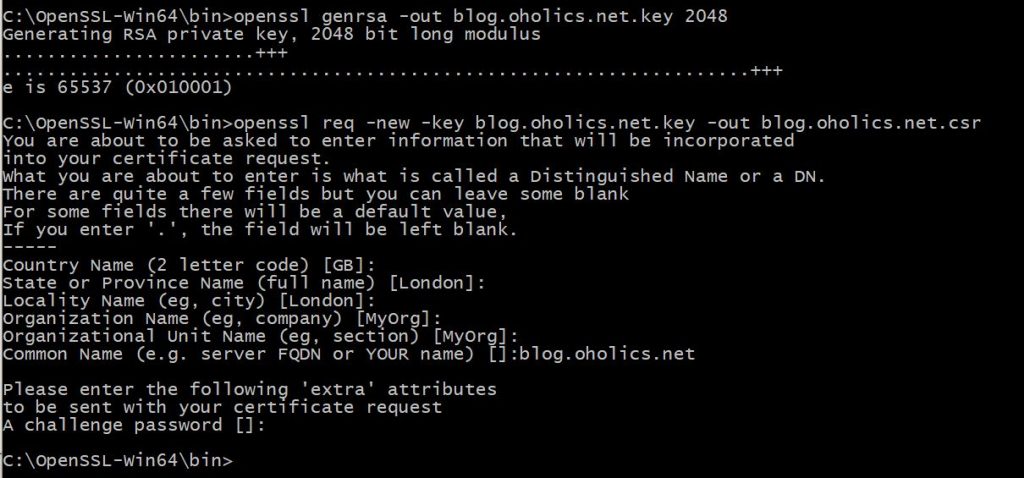
Generate the private key:

  • openssl genrsa -out blog.oholics.net.key 2048 (note: amend the numbits value as appropriate)

Generate the CSR, amending the country name and other values as appropriate, add the CN of the server when prompted:

  • openssl req -new -key blog.oholics.net.key -out blog.oholics.net.csr

Validate the CSR – check that the SAN’s are correct

  • openssl req -in blog.oholics.net.csr -noout -text

Once happy, submit the CSR to your CA. Wait for the response, save the file as blog.oholics.net.crt

Now, to combine the certificate file and the private key into a pfx file (providing a secure password when prompted):

openssl pkcs12 -export -out blog.oholics.net.pfx -inkey blog.oholics.net.key -in blog.oholics.net.crt -certfile blog.oholics.net.crt

Use the resulting file as you desire 🙂

PowerShell Module for AD/ ADLDS Schema modification

A couple of years ago a colleague within my company (Avanade) published a link to a GitHub project that he had just completed: https://github.com/SchneiderAndy/ADSchema

I had just finished working on a project using MIM to synchronise identities and groups from two domains into one Microsoft ADLDS instance, using the ProxyUser class to allow ADLDS to become a common authenticator for a divestment. While proving out the solution, the target ADLDS instance was trashed and rebuilt countless times. The rebuilds were time consuming and boring. With this use case in mind, I took a fork of Andy’s solution and spent a few months (off and on) to modify the module to allow its use against ADLDS, as the methods used to interact with ADLDS were often very different.

My version of the module can be found here: https://github.com/jkbryan/ADSchema, the detailed usage examples are detailed in the readme file.

If you want to give it a try, please, please test against something non-production! I will not be held responsible for any mistakes made while using the module. Test, test and test again before using it in a production environment!

Time flies when you are having fun!

Ha-ha! only one year (and a bit later) I finally finished the tidy up. All code samples are now in github gists. Crayon Syntax Highlighter is no more, it was a good plugin, but time for something better.

I found some odd formatting issues in some of the code samples. I reckon most of these are a legacy from when the blog was running on a Raspberry Pi and the cheap 4GB SD cards the the blog was running on were getting corrupted almost once a week. I used to spend hours every week recovering either the database or the entire disk image. Ahhh, such fond memories :), but a great way to learn.

It has been a super busy year, learning some new stuff focused on Azure infrastructure, Azure RBAC and AAD authentication to legacy applications. I’ll publish some content related to these activities soon.

Migration complete

I’m pleased to say that I have now finalised the migration of content from fim.oholics.net, script.oholics.net, rpi.oholics.net and 365.oholics.net into this new blog site. All re-directors/ etc. appear to be working as planned.

I have noticed a few formatting issues with the Crayon syntax highlighter plugin on some posts, so have migrated those that were ‘broken’ to GitHub Gists. I’ll eventually migrate all of the code samples/ snippets to Gists, as they should display more consistently and remove the need for rendering each sample by WordPress.

A long lull, Certificate Authority distrust issues and a platform migration.

The last year or so has been interesting, moving from “normal” work to consulting, a great change! With the drawback of having less time to commit to getting stuff on here as well as greater concerns over intellectual property rights and confidentiality.

The various blogs/ sub-domains that I run, covered under the oholics.net moniker, all had free certificates issued by the (now effectively defunct) StartCom CA. In October 2016, Mozilla started to distrust them – backstory here: https://blog.mozilla.org/security/2016/10/24/distrusting-new-wosign-and-startcom-certificates/.

Initially, it looked like the low traffic sites were those that were affected (they had the newest certificates), so I kind of took the lazy approach of just leaving them as is. I figured that that start.com would get their new CA in place and trusted reasonably quickly, not so! I recently noticed that Mozilla/ Chrome had started distrusting even those certificates that were generated prior to October 2016. So now all of the blogs were generating security errors, this was not ideal. I looked at moving to Let’s Encrypt, but it would not have been a simple migration – more than a five minute job. Then, a few weeks ago, I noted that start.com had their new CA in place. Great! but when I asked their support people about global trust, the answer was “not yet”, with no idea of when that would be in place.

I was still running the hosting platform from home, which was less than ideal, given the lack of a fixed IP and intermittent issues with Dynamic DNS not updating, plus the running costs/ fire risk etc….

So, I recently made the decision to migrate the platform to a cloud provider and to get the certificates issues resolved properly, moving finally to Let’s Encrypt. On a fresh server, it was remarkably easy to setup, just requiring a little DNS Flip-Flopping to get things in order.

Now it is all in place/ tidy, I have a bunch of stuff to add to the blog. However, FIM is going EOL, so the name of this blog is going to become defunct too! Managing and maintaining the other blogs as separate entities is a bit of a PITA too. Therefore, I plan to (eventually) migrate content from all 4 blogs into one new core blog site – name TBD. I may add some stuff here in the meantime, just to get it out of my brain and onto paper, so to speak… else I may wait until I have done the migration component – depends on how long it might take..

Until then, I hope the previous content still provides a good repository for FIM “stuff” for others as well as myself 🙂

MIM PAM Automated Installation Script

I have been doing a fair bit of work with MIM PAM recently, finding a few issues. This has meant that I have re-installed the application (post-SharePoint Foundation), in my lab, a few times.

I was getting a little bored of clicking through the options, ticking boxes and refilling the URL’s etc. Then I spotted on the CD/ DVD, a batch file in the Service and Portal folder – called “Service and Portal_Reference_For_PAM_Install.bat“.

A quick look showed that this would automate MIM PAM installation. However, there was no documentation to go with it – notably to clarify which accounts were referred to by  “ADMIN_USER = Administrator” and “SYNC_ADMIN = FIMSyncAdministrator”. A quick google revealed no relevant results…. So, take a snapshot and start trying accounts….. Based on the MSI command run at the end of the script Admin User relates to the SERVICE_ACCOUNT_NAME. So, in my case that relates to the MIMService account.

Thus, my complete working script is as below. Note – my PAM domain is a sub-domain of oholics.net called “priv“, my MIM PAM server is called “mimpam

Note that the following lines will need to be amended – 7, 10, 17, 19, 20, 21, 22, 35, 54, 55, 62, 63, 70, 71.

Also, note the script assumes that you have a folder C:\Temp to write the log to – if you don’t you’ll get EXIT CODE: 1622

Nice bit of automation – run the file, then make coffee or whatever – certainly something fulfilling 🙂

A little update – the script in its current form is not perfect. Note that the MSI switches include: MAIL_SERVER=”%MACHINENAME%” and SQLSERVER_SERVER=”%MACHINENAME%” – Meaning that both attributes will be set to the local machine name. Set some more attributes and changes the MSI arg’s to suit.

Additionally, I have been testing the RESTful interface over the last few days and have seen some oddities – whether these are related to using this script to install is under investigation…..

New-PAMDomainConfiguration: There was no endpoint listening at http://localhost:5725/ResourceManagementService/MEX

Still suffering pain trying to get the MIM PAM lab setup on my underpowered Hyper-V System.

I was having a lot of issues with getting the New-PAMDomainConfiguration cmdlet to run successfully, so after lots of debugging; I gave up, trashed the current lab setup and started again, following the lab guide to the letter this time! Well, almost.. I only have two VM’s these are the DC’s for each domain, with everything crammed onto them.

A quick error and fix – as per the title:

New-PAMDomainConfiguration1

Issue was that the SQL service had not started, thus the Forefront Identity Manager Service had not started. Fix… start those pesky services and try again. I believe that the services are failing to start simply because of little resource (2 GB RAM only).

Now that was simple, but I’m still seeing the problems that I was seeing before; that being that when running the New-PAMDomainConfiguration after starting the services, I get the following unhelpful error:

New-PAMDomainConfiguration: The Netdom trust command returned the following error:

New-PAMDomainConfiguration2

Ah the “Blank Error” error – digging through the $error variable does not reveal anything useful. If I find a solution, I’ll be back….

I posted a question on the TechNet FIM forum:

https://social.technet.microsoft.com/Forums/en-US/be2433b4-daa6-493c-8922-684df506337d/newpamdomainconfiguration-the-netdom-trust-command-returned-the-following-error?forum=ilm2

The workaround provided by Jeff seems to have worked – well there were no errors executing the detdom commands. I have a few more bits to do to complete the lab and verify that all is working as expected.

Delegating Group Management – Using the Lithnet FIM PowerShell Module

Within my AD structure, group management is delegated within certain OU’s, I now need to replicate that functionality in the FIM portal.

The is no real way of identifying which groups should be managed by whom, except the OU within which the group currently resides.

So, to start off with I need to get the parent OU of the group into the portal:

Import the OU into the MV:

Setup an export flow for adOU into the portal.

Then, by using the Lithnet PowerShell Module, we can create all the sets and MPR’s required, below is a sample for creating one delegated “collection”. In production, my XML file is much bigger – delegating group management to around ten different groups.

Note, that you first need to create references to all users who might be given the rights to manage groups. This includes the FimServiceAdmin and FimServiceAccount – referenced by their ObjectID, the others are referenced by their AccountName. All members referenced in this section, are added to the __Set:GroupValidationBypassSet. This set is defined in the non-administrators set – not in this set – this bypasses the group validation workflow:

AllNonAdministratorsSet

Create a set of groups to be managed – the filter being the OU that the groups belong to & MembershipLocked=False

Create a set of administrators for this delegation – adding the explicit members

Then create the two MPR’s to allow the members of the administrative set to manage those groups – the first MPR allows modification (Read, Add and Remove) of the ExplicitMember attribute, while the second allows creation and deletion.

Use Import-RMConfig -File <PathToXML> -Preview -Verbose to validate your xml and see what it would do. Drop the “-Preview” to make the change