Gist

Contains GitHub Gists

Hiding Portal Buttons from Normal Users

Recently, one of my co-workers was assigned to work with me to learn some FIM and to help, where possible, with some configuration.

One of the things on my list of “things to do” was to find a way of hiding certain portal buttons from a normal users view – after all they are not (currently) going to be allowed to use the portal for any self service task yet – that might come later….

So, I sent my co-worker off to find and implement the solution in the test environment, thinking “It can’t be that hard…”

I had already implemented the following solution to hide New and Delete User buttons:http://blogs.msdn.com/b/connector_space/archive/2014/10/02/5-minute-fim-hacks-hiding-the-quot-new-quot-and-quot-delete-quot-user-buttons.aspx

A week later we met to see how much progress had been made, he had found the following information (http://social.technet.microsoft.com/wiki/contents/articles/2139.how-to-remove-new-delete-and-other-buttons-from-fim-portal-pages.aspx), but didn’t really understand what it meant. So, we went through it together. I must admit, when I first read it through, it didn’t make a lot of sense to me either, but after a few re-reads it clicked into place.

This was done around 1 month ago and already I’m forgetting the actions that were carried out, so I’m going to document the steps in a more verbose fashion here for future reference.

Create new search scopes, using the original Search Scopes’ values as the basis. The resource type shold be “Resource”.

SearchScopes

I had already setup a new Usage Keyword “PrivilegedUsers”, that I was using to control the things that the helpdesk users would see to do their admin tasks. So, in the original search scopes this keyword needs to be added and the BasicUI and GlobalSearchResult keywords should be removed. Then in the (new) copies of the search scopes, BasicUI and GlobalSearchResultshould be present.

Original and New Search Scope Usage Keywords:

Do an IIS reset….

Now on the home page, choose one of those new search scopes and do a “blank” search. Copy the URL that this search went to – note that the UI of this search presents only the details button.

Do the same thing for each of the new search scopes, copying the URL’s for later….

Now we need to make those URL’s available via the portal UI. We need to do this for both the Navigation Bar and Home Page, so create new resources, using the information within the originals as the basis. The only change that I made was to remove the reference to (DGs) and (SGs) for the top level items and to add a description “User Read Only view” for those new items with the same name (so that I could tell the difference):

NavBarResources

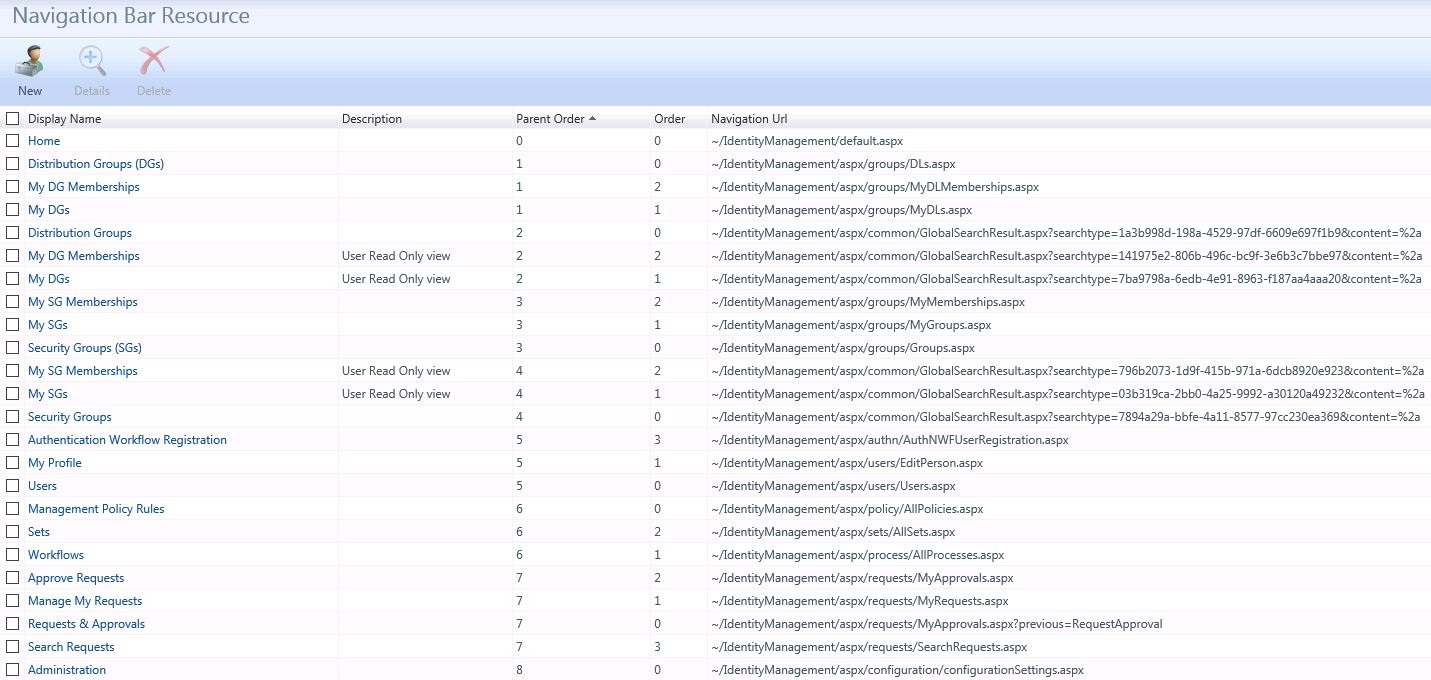
Use the URL’s that were obtained from the search scopes to define the behaviour of the Resource:
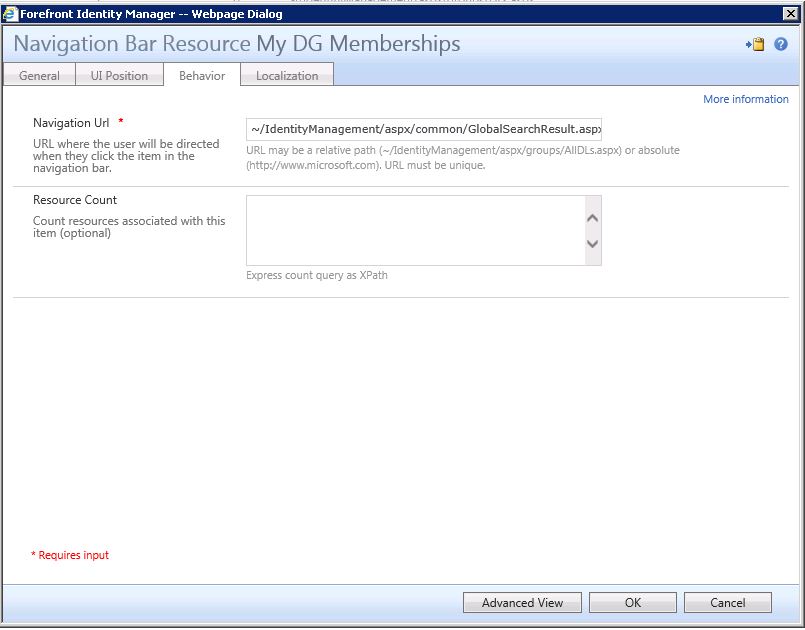
Behaviour

Do an IIS reset….

If you copied the Parent Order and Order values of the original Resources, the result is a little messy from the Administrators POV, as all of those items are crammed together. Unfortunately, I know of no way to hide an item from the admin, so I just rearranged the order of the layout. It displays as follows after re-arranging both the Nav Bar and Home Page Resource orders:

HomePage_Admin

A normal user looking at the portal sees this, the links go to the URL’s in those Search Scopes defined earlier:

HomePage_User

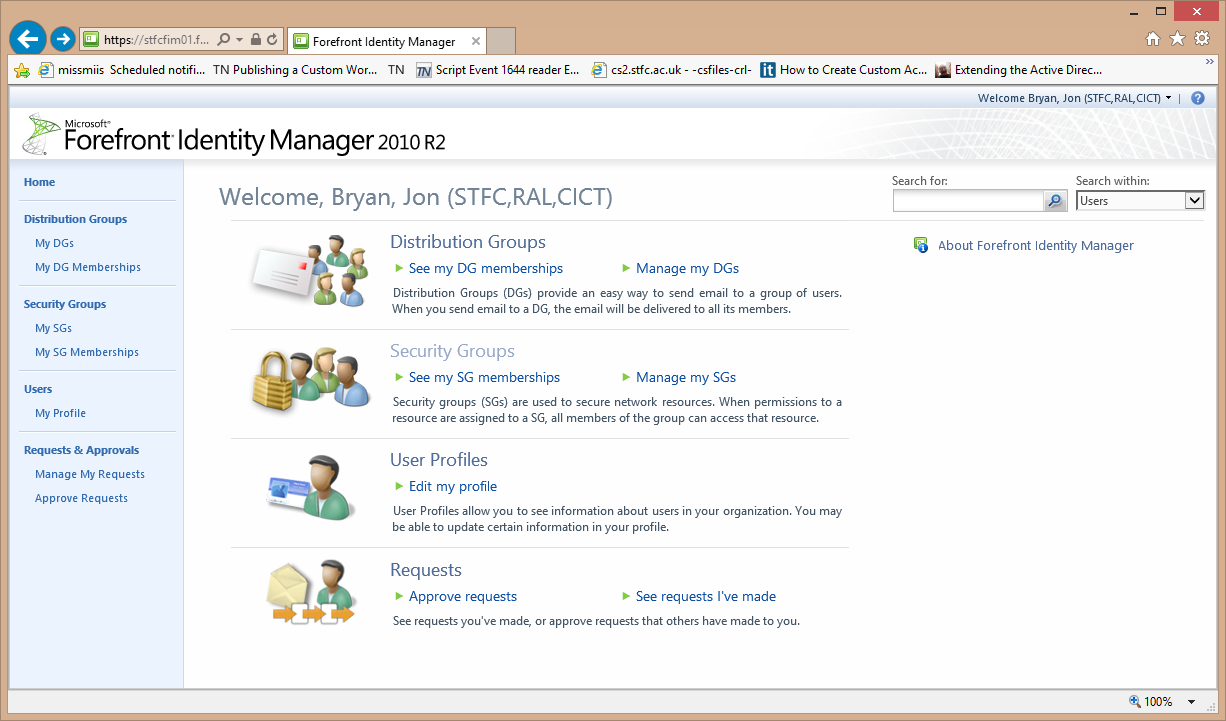
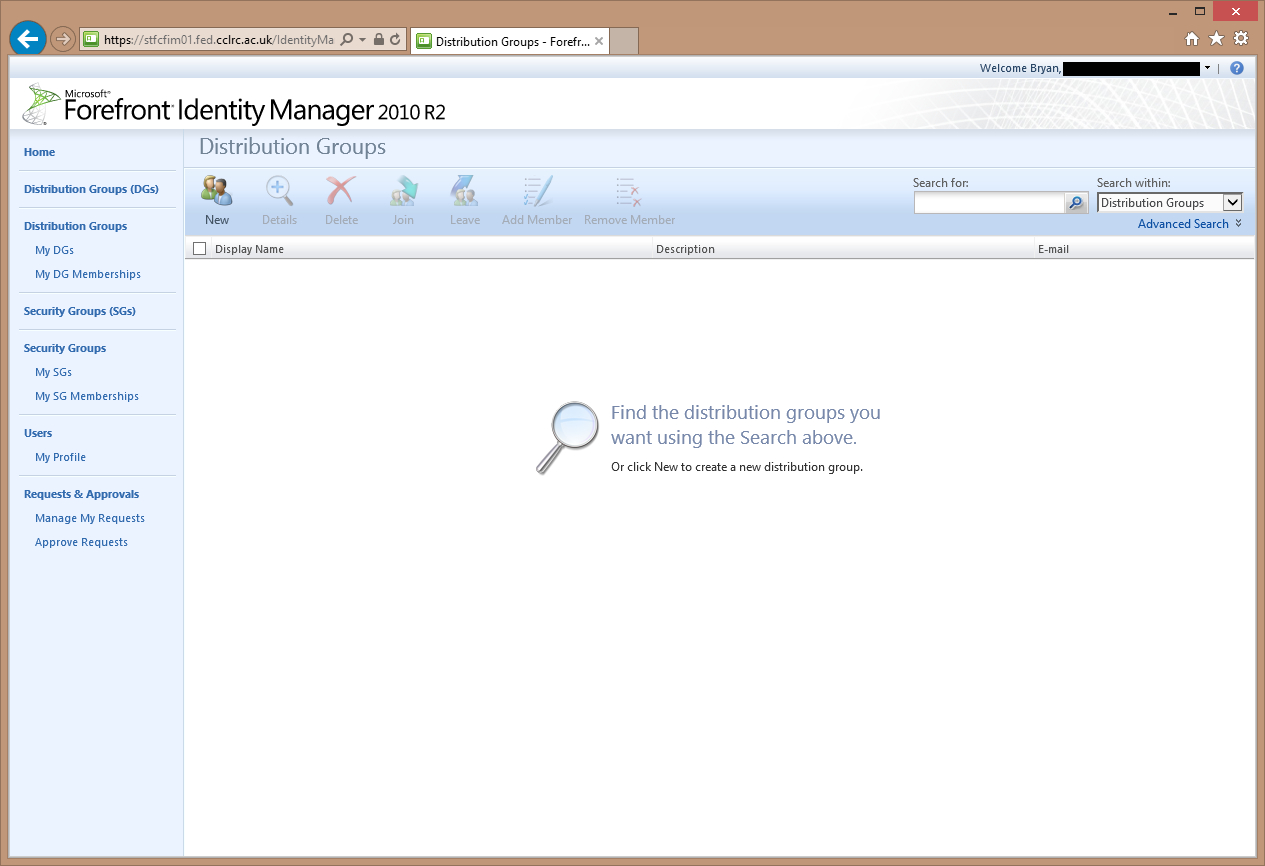
And when looking at for example “Distribution Groups”, sees that Details button only:

HomePage_User_Result

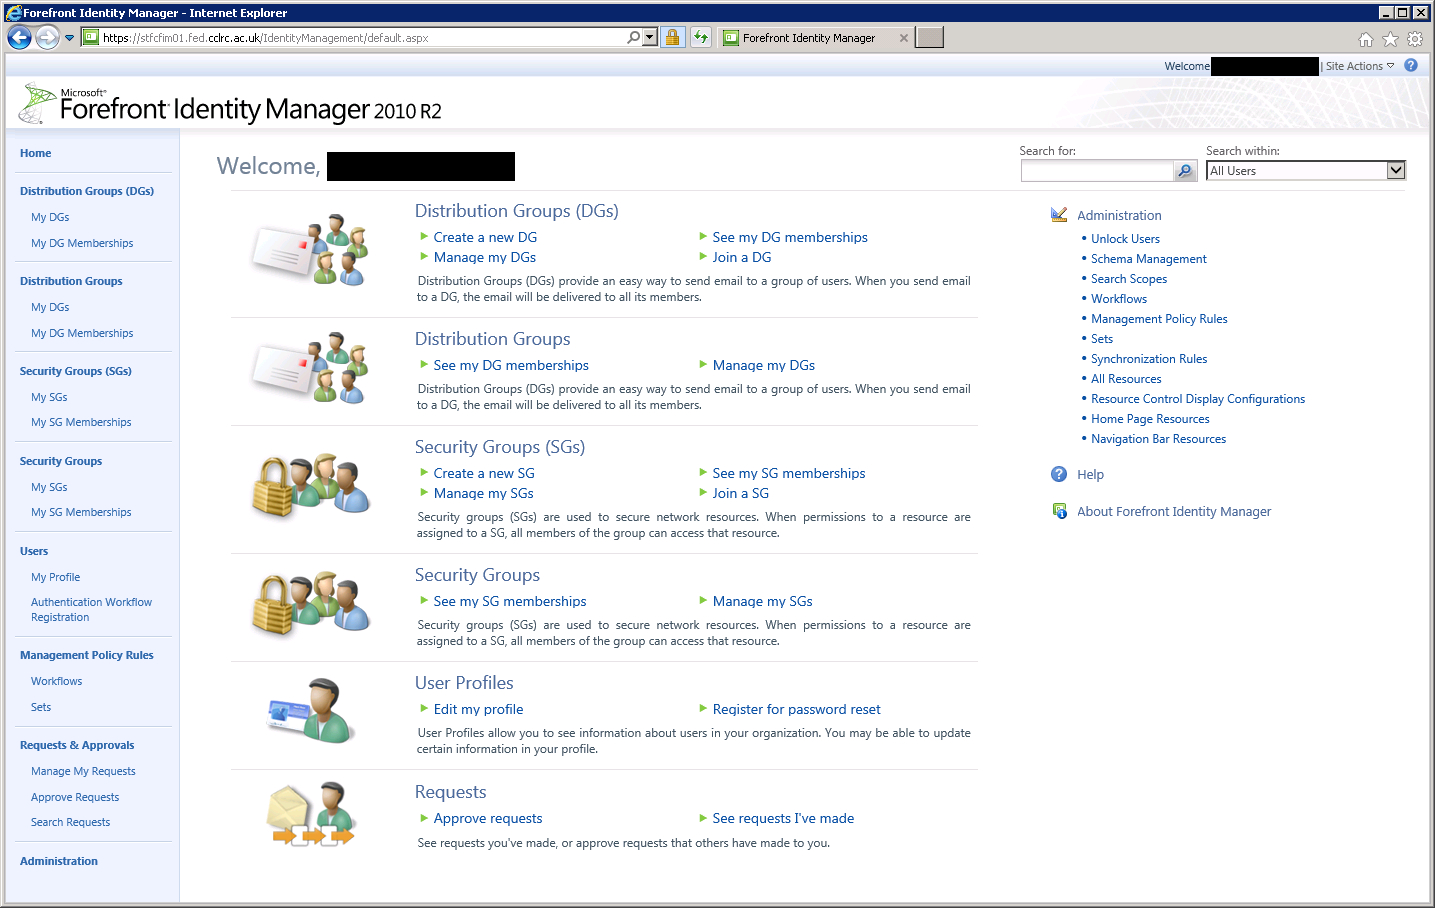
The PrivilegedUsers view, looks like this:HomePage_PU

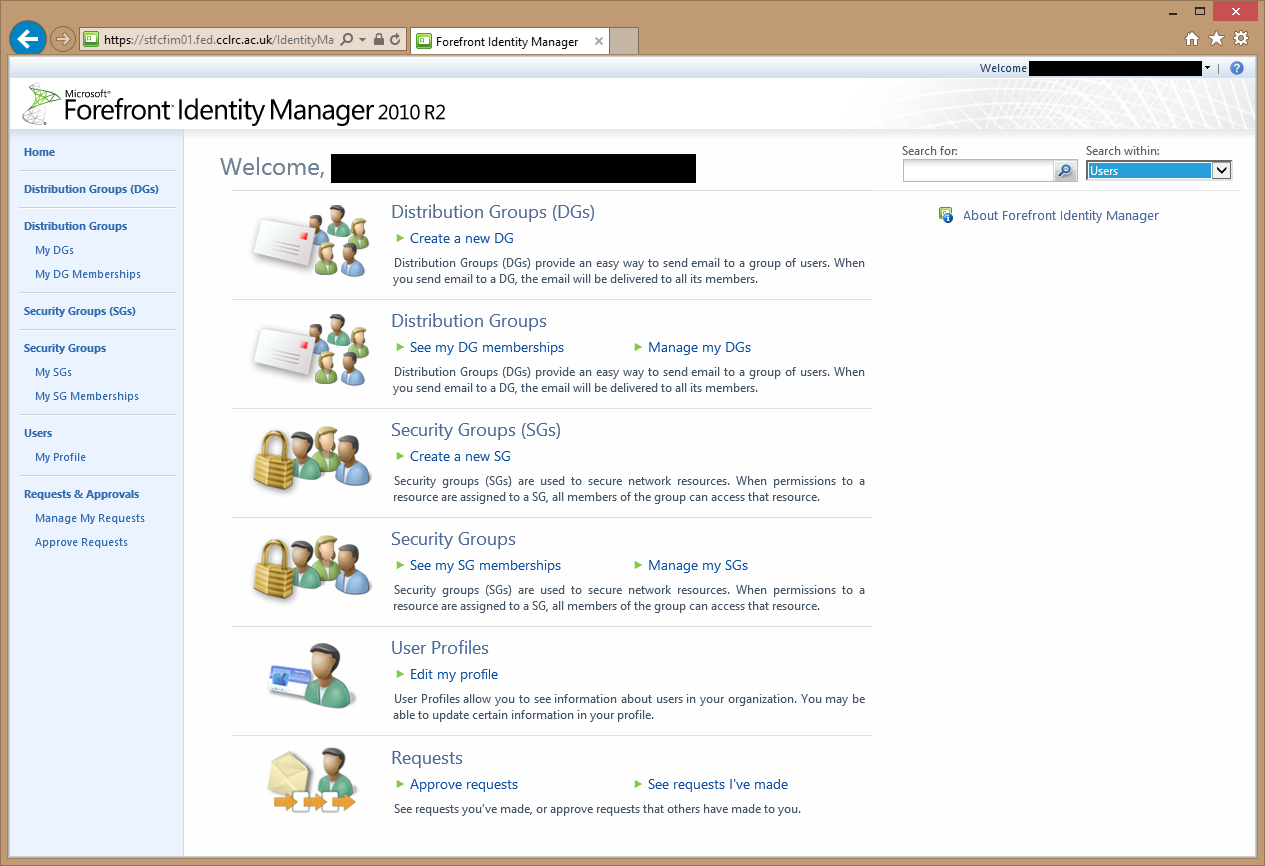
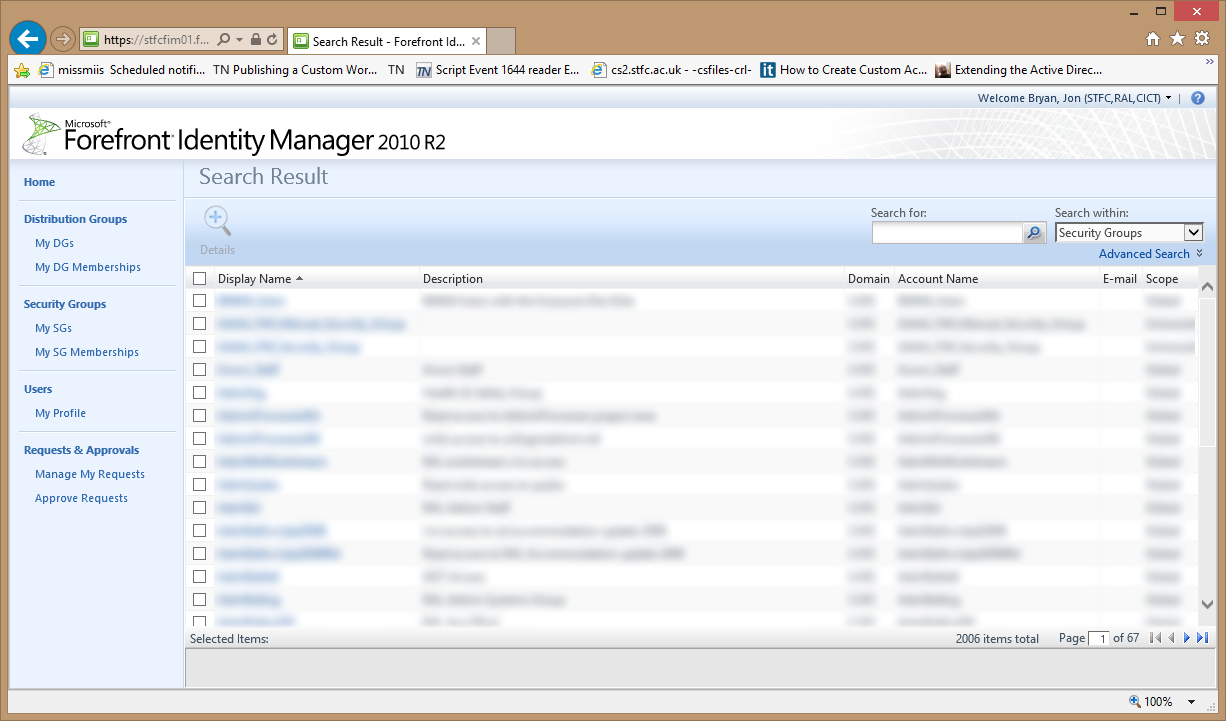
And if a member of PrivilegedUsers uses the Distribution Groups (DGs) link, they see this – note all of the buttons are available:

DIst_PU_View

If I remember missing something or something not being quite right, I’ll be back to correct…

Setting IE Proxy Settings

A number of years ago, I rationalised the way that IE proxy settings were delivered to supported systems. Previously, this had been done via installation scripts, which were not enforced after application, so were prone to subsequent error.

To achieve consistency and ease of deployment Group Policy was used. Back then there were Internet Explorer Maintenance GPO settings, which allowed the LAN Proxy setting to be deployed easily. However, I also wanted to make consistent the delivery of VPN settings. This was also achieved by using Group Policy to deliver a VPN address book (rasphone.pbk) to the clients.

In order to get the correct proxy settings assigned to those VPN connections, I used a little scripting.

First, find out on my test machine what the text in the IE proxy GUI translated to, where I had already setup the VPN connections and set the correct proxy settings:

Then use the results of that to create a new vbs script to be pushed out as a User login script:

Getting license details for your licensed O365 users

Part of the process of getting the script in the previous post working was having a record of who is licenced *now*.

This was done using the following script. Note that the commented lines must be un-commented to log the data, I am currently using this script to keep the AD groups up to date , hence the Add-ADGroupMember lines are uncommented. AD groups will soon be replacing the text files.

Office 365 Licence Management

Since introducing O365 to my organisation, there has been a steady flow of people wanting to use services within it. The licences for which have been applied on an ad-hoc basis by several global admins.

Now we are in a position to make these services more official/ production, I needed to licence those users who were not yet licensed, plus sort out the improperly licensed people.

It seems that either one of those global admins who was assigning licences or maybe self registered users were getting the Information Worker licences – e.g. STANDARDWOFFPACK_IW_STUDENT. This was not desired, so my script had to sort those out as well!

Additionally, people whose status changed from being staff to anything else needed to have any staff licence revoked and replaced with a student licence – and vice versa.

I also wanted to control who should be given those individual licences, like Office Pro Plus and Dynamics. For the moment, those entitled to these licensed are held in text files – I’m working on migrating to using AD groups instead, but for now just needed something that just works!

The script logs added and removed licences, to C:\Office365-Scripts\Licencing\LicenceManagement.txt

Error emails are based on the content of the $error variable, using a function to generate the mail body.

Here is the script:

Getting PiGlow working on Arch Linux with Raspberry Pi 2

It initially seemed like a trivial task; after all getting the PiGLow working under Raspian was very simple!

But under Arch the method is significantly different…So, after digging about, getting all the pieces together – this is what I have and it works!

Now to get this to run on start-up…

Using Credential Manager to authenticate Office 365 scripts

When I initially started delving into the management of my Office 365 tenancies, I was looking for a secure way of providing a username and password, with which to authenticate (connect) to MSOL.

I didn’t particularly like the idea of putting plain text usernames and passwords into my scripts. However, shortly after getting my ADFS servers up and running, I applied the Microsoft Office 365 Federation Metadata Update Automation Installation Tool. If you look at how this works, you see that it uses Credential Manager to store the username and password. It extracts these when needed to connect to MSOL. This seemed like a nice clean solution, so I “borrowed” the methodology for most of my O365 scripts.

Take note that the Windows Credential Manager is profile specific, so if you need a service account to run some of your scheduled tasks of the like; then you need to create the credential under that profile. If you ever want to change the password of the account stored in credential manager, you can change it via the GUI, but remember that you need to do it for every profile that might use it.

So, first we need to create the credential that we want to use in our scripts:

Note line 31 – $TargetName = “LicenceManagment” – this is the label of the “Credential”, this is what is used in the subsequent scripts to get the credential.

OK, so now we have the credential stored, lets test it – I often end up using this generic connection script, when I want to have a quick look at something in MSOL:

Thus, this Generic connection script is the basis for most of my management scripts, the rest is just bolted onto the bottom.

Cleaning and validating input data

The HR data source, that I currently receive person data from, has historically had data quality issues. These are much better than they were in the past, but still cause a few issues.

When I attended FIM training at OCG, I raised the issue of data cleanliness and was told in simple terms – make sure the input data is clean! If only life was so simple…..

Back to reality, I have had to add code to my Advanced Flows to deal with, clean up and validate the input data.

A nice example follows – importing Surname from HR – dealing with:

  • Just plain bad data (null as a string/ value)
  • Validation (characters that should not be present – via regex replace)
  • Clean up (removing spaces from around hyphens – double barrelled names).- there is also a bit of trimming to remove and spaces before or after the string value
  • Surname missing!

Things like this remind me of why “Codeless Provisioning” was something I fought to get working (for too long), but ultimately had to abandon in favour of using code for almost everything. Doing so has been a real panacea for all of the rules and other funnies that I have had to accommodate.

Note: I made a little edit – I was not checking for the presence of AccountName before raising errors – should that attribute have been missing (highly unlikely, but not unknown to occur), that would have raised an error in itself. The edited code is a little more robust!

Cancelling FIM Requests

A few days ago, I made a mistake while messing with my test set. I was getting bored of making myself drop in and out of a set (using the GUI) by changing my AccountName between my real account name and my AccountName plus another character. I was doing this to test my PowerShell workflow.

I was looking to use the Lithnet PowerShell cmdlet to add and remove me as a manual member. While trying to make this work, I removed my AccountName from the criteria based membership – thus the mistake was made!

I saw rather a lot of PowerShell workflows kicking off. Initially, I didn’t understand what was happening, until I looked at the requests and saw that each request was for a different person. By removing my AccountName from the criteria based membership, I had opened up the membership of my Test Set to “All Users”, thus all users fell into the set and kicked off a PS workflow. Bugger!

I found this: http://www.integrationtrench.com/2013/09/use-powershell-to-cancel-bunch-of-fim.html, which I’ll leave here for future reference. But in the end decided to just let the workflows progress, it was late in the day anyway, they would be done by the morning. A quick test of the commands in the referenced post indicated that it was going to take an age to get all of those requests the were in a Post Processing state.

Of course by the time it had got them all, many may have been processed by then anyway..

Lesson learnt: change the scope of a set carefully!

Bulk disabling MPR’s with Lithnet RMA

Now that my notifications are ready to go and there are a few real recipients (testers), I was considering what would happen when the FIMMA jobs were run – lots of emails!

The FIMMA had not been run properly for a few days – this is still a system in building – so there were a lot of attribute changes to export. Also, I’d had to put an MA back in temporarily, to fix up some bad end dates – I needed to fix precedence so that this was now lower – thus quite a few end dates had changed in the intervening period. That MA will be removed again shortly…

So, I needed to quickly disable all of the MPR’s that would trigger sending the emails. Again the Lithnet RMA was a great and quick solution!

Comment out/ uncomment out the true/ false lines as appropriate. I’ll need to re-enable all of these again once the FIMMA has run through.

Using the Lithnet RMA to make the changes from the last post.

Looking at what to do after creating all of the PowerShell WorkFlow scripts and respective html files, I started looking at what I’d need to change in my Lithnet XML configuration file.

Wouldn’t it be nice, if I could use that to update the configuration? What do I need to change? The MPR’s can remain, the sets are still valid, so only two changes per process/ collection – remove the email template, as it is now superfluous, and update the workflow definition.

What does a PowerShell XOML look like? I have no idea!

But using the Lithnet RMA, I can get it from my development workflow:

Great, so now I only need to comment out (or delete) the “Out” email templates and modify the existing XOML files for the “Out” operations to reflect the PowerShell workflow – pointing at the correct script – easy. Then run the Import-RMConfig cmdlet again to import those changes. I’ll just delete those few mail templates manually.