Azure Service Principle Authentication

I have recently been working within a client where all Azure/ Office 365 users must perform MFA on logon.

Ages ago I posted about using credential manager to automate Office 365 scripts: https://blog.oholics.net/using-credential-manager-to-authenticate-office-365-scripts/. This method will clearly not suffice where MFA is enforced, as there is no mechanism to allow MFA challenge and response.

Recently I have been looking into using Azure Service Principle objects to bypass MFA and to allow scripts, that need to connect to Azure or other services, to do so without input. Thus, I can then schedule scripted tasks to generate reports on Azure AD objects or AzureRM items.

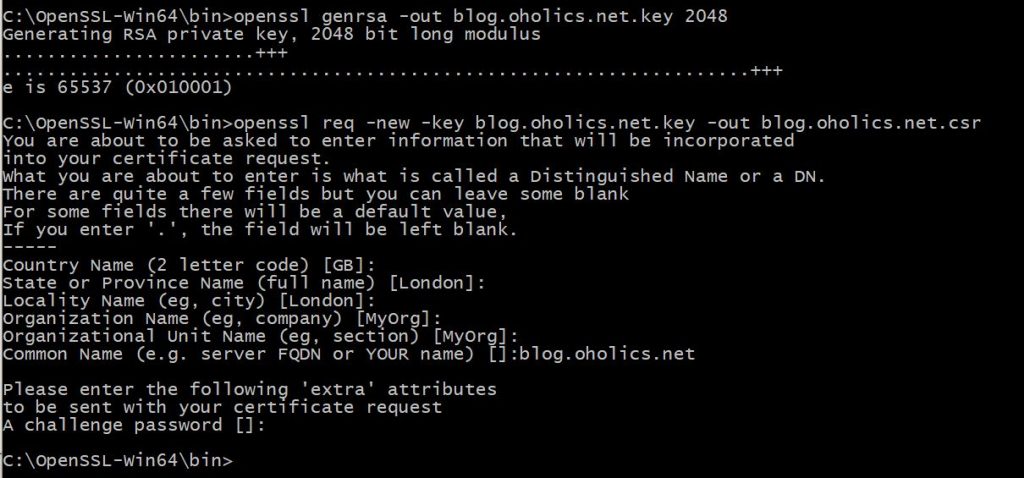
Firstly I need to create some certificates, these will be used to authenticate, see here: https://blog.oholics.net/creating-simple-ssl-certificates-for-server-authentication-using-openssl/ for details on certificate creation.

Next, once we have the PFX certificate file, we can create the Azure App Registration, using PowerShell:

Then (optionally), if the script that you want to automate will be reading AzureRM objects, run the following script. Note that if the role assignment is to be constrained to a specific resource group, add the  -ResourceGroupName switch to New-AzureRMRoleAssignment

Additionally, the RoleDefinitionName can be altered to suit.

Now we have the Service Principle in place, we can connect! But in the case of the Azure AD connection, I need to first allow the application to Read AAD:

Go to the App Registrations blade in Azure AD, pick the application created earlier, then select settings. Select Required Permissions, add Azure AD and add the permissions shown in the following image:

Now lets connect using the certificate thumbprint:

By installing the certificate in the CurrentUser store, only that user can consume the certificate thumbprint for authentication using this method. Lovely.. 🙂

Why is this method secure?

  • You can only access the application to sign in if you have installed the certificate on the machine that you want to run the script from.
  • To install the certificate, you must know the password that was set on the private key during PFX creation.
  • No AAD user object is created
  • No plain text passwords need to be stored

To sign in using this method, you must know:

  1. The AAD Tenant GUID
  2. The Application GUID of the configured application
  3. The specific thumbprint of the certificate, used to make the connection
  4. The certificate and private key must be installed on the machine on which the connection attempt is being made.

Can’t rename, move or delete an OU

Today, I came across something that had me quite stumped…. well for a few minutes anyway 🙂

I was doing some tidying up of a domain, I found an OU that was incorrectly named, it was not to design. I thought, I’ll just rename it, but found that the option to do so was not available.

I took a look at the attributes of the OU, two immediately struck me as odd:

systemFlags was set to DISALLOW_DELETE|DOMAIN_DISALLOW_RENAME|DOMAIN_DISALLOW_MOVE


isCriticalSystemObject was set to TRUE:


Neither of these attributes could be modified, an error was thrown if attempted.

The simple answer: This OU had been set as the default location for new computer objects via redircmp 

By running redircmp CN=Computers,DC=oholics,DC=net (or your other true destination):

  • The systemFlags attribute was banished
  • The isCriticalSystemObject attribute was set to FALSE
  • The OU could be renamed, moved and deleted 😉

Creating simple SSL certificates for server authentication using OpenSSL

It is often useful to have a standalone and reliable process for provisioning SSL certificates, using an existing CA (internal or public) for use on enterprise servers.

This process makes use of OpenSSL, the Windows binaries for which can be found here: https://slproweb.com/products/Win32OpenSSL.html

Once installed, use an administrative command prompt and navigate to C:\OpenSSL-Win64\bin.

Use the following OpenSSL configuration file (backup the original first) in the bin directory:

Edit line 232 to define the first SAN for the certificate, this should match the common name of your certificate. Add further SAN’s in the subsequent lines.

For example, if my server advertised DNS name is blog.oholics.net, but I also want the root domain to be added as a SAN, then DNS.1 = blog.oholics.net and DNS.2 = oholics.net.

Run the following commands.

Generate the private key:

  • openssl genrsa -out blog.oholics.net.key 2048 (note: amend the numbits value as appropriate)

Generate the CSR, amending the country name and other values as appropriate, add the CN of the server when prompted:

  • openssl req -new -key blog.oholics.net.key -out blog.oholics.net.csr

Validate the CSR – check that the SAN’s are correct

  • openssl req -in blog.oholics.net.csr -noout -text

Once happy, submit the CSR to your CA. Wait for the response, save the file as blog.oholics.net.crt

Now, to combine the certificate file and the private key into a pfx file (providing a secure password when prompted):

openssl pkcs12 -export -out blog.oholics.net.pfx -inkey blog.oholics.net.key -in blog.oholics.net.crt -certfile blog.oholics.net.crt

Use the resulting file as you desire 🙂